If you wish to enhance your UI design expertise, have you ever tried chess? I do know it sounds contrived, however hear me out. I’m going to take an idea from chess and use it to construct a toolkit of UI design methods. By the top, we’ll have coated coloration, typography, lighting and shadows, and extra.
Article Continues Beneath
However it all begins with rooks and pawns.
I would like you to assume again to the primary time you ever performed chess (in case you’ve by no means performed chess, humor me for a second—and no biggie; you’ll nonetheless perceive this text). In case your expertise was something like mine, your pal arrange the board like this:
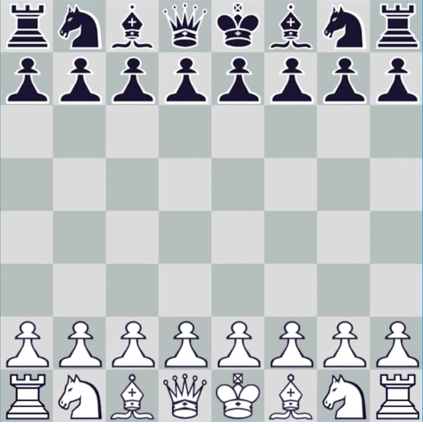
And you bought your clarification of all of the items. This one’s a pawn and it strikes like this, and this one is a rook and it strikes like this, however the knight goes like this or this—nonetheless with me?—and the bishop strikes diagonally, and the king can solely do that, however the queen is your greatest piece, like a combo of the rook and the bishop. OK, wish to play?
That is most likely the commonest approach of explaining chess, and it’s sufficient to make me hate board video games eternally. I don’t wish to sit by way of an arbitrary lecture. I wish to play.
One specific chess participant occurs to agree with me. His title is Josh Waitzkin, and he’s really fairly good. Not solely at chess (the place he’s a grandmaster), but in addition at Tai Chi Push Fingers (he’s a world champion) and Brazilian Jiu Jitsu (he’s the primary black belt below 5x world champion Marcelo Garcia). Now he trains financiers to go from the highest 1% to the highest .01% of their occupation.
Level is: this dude is aware of lots about getting good at stuff.
Now right here’s the loopy half. When Josh teaches you chess, the board seems to be like this:
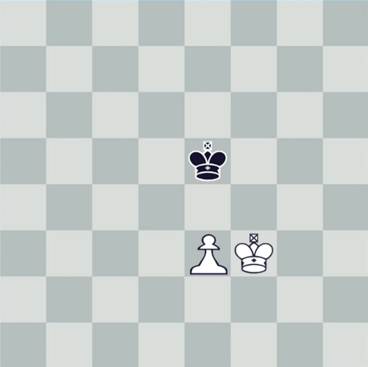
Whoa.
In comparison with what we noticed above, that is stupidly easy.
And, if you understand how to play chess, it’s much more mind-blowing that somebody would begin instructing with this board. Within the precise recreation of chess, you by no means see a board like this. Somebody would have gained lengthy in the past. That is the chess equal of a avenue combat the place each guys break each bone of their physique, dislocate each their arms, can hardly see out of their swollen eyes, but proceed to combat for an additional half-hour.
What offers?
Right here’s Josh’s pondering: whenever you strip the sport all the way down to its core, every part you study is a common precept.
That sounds fairly lofty, however I feel it is smart when you think about it. There are many issues to distract a starting chess participant by a fully-loaded board, however every part you begin studying in a king-pawn scenario is basically essential to chess:
- utilizing two items to use strain collectively;
- which areas are “nóng”;
- and the distinction between driving for a checkmate and a draw.
Are you questioning if I’m ever going to start out speaking about design? Glad you requested.
The only attainable state of affairs#section2
What if, as an alternative of attempting to design an complete web page with dozens of components (nav, textual content, enter controls, a emblem, and many others.), we consciously began by designing the easiest factor attainable? We intentionally restrict the taking part in area to one, tiny factor and see what we study? Let’s attempt.
What’s the easiest attainable ingredient? I vote that it’s a button.
That is essentially the most fundamental, default button I might muster. It’s Helvetica (default font) with a 16px font dimension (fairly default) on a plain, Sketch-default-blue rectangle. It’s 40px tall (good, spherical quantity) and has 20px of horizontal padding on both sides.
So yeah, I’ve already made a bunch of design choices, however can we agree I mainly simply used default values as an alternative of constructing choices for principled, design-related causes?
Now let’s begin taking part in with this button. What properties are modifiable right here?
- the font (and textual content styling)
- the colour
- the border radius
- the border
- the shadows
These are simply the primary issues that come to my thoughts. There are much more, in fact.
Enjoying with the font is a reasonably straightforward place to start out.

Now I’ve modified the font to Moon (accessible at no cost on Behance for private use). It’s rounded and smooth, not like Helvetica, which felt a bit extra squared-off—or a minimum of not as overtly pleasant.
The humorous factor is: do you see how the superbly sq. edges now look a tad awkward with the rounded font?
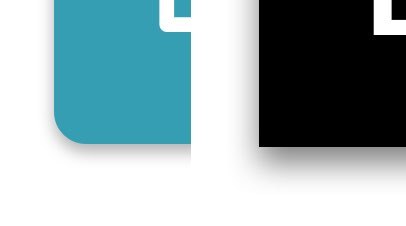
Let’s around the corners a bit.

Bam. Good. That’s a 3px border radius.
However that’s type of bizarre, isn’t it? We adjusted the border radius of a button due to the form of the letterforms in our font. I wouldn’t need you pondering fonts are simply loosey-goosey artistic endeavors that solely work whenever you say the proper incantations.
No, fonts are shapes. Shapes have connotations. It’s not rocket science.
Right here’s one other fashionable font, DIN.
Particularly, it is a model referred to as DIN 2014 (accessible for reasonable on Typekit). It’s the epitome of a squared-off-but-still-readable font. A bit harsh and no-nonsense, however in a bureaucratic approach.
It’s the official font of the German authorities, and it seems to be the half.
So let’s check our working speculation with DIN.

How does DIN look with these rounded corners?
Nicely, we have to examine it to sq. corners now, don’t we?

Ahhh, the squared-off corners are higher right here. It’s a way more constant really feel.
Now take a look at our two buttons with their separate fonts. Which is extra readable? I feel Moon has a slight benefit right here. DIN’s letters simply look too cramped by comparability. Let’s add a little bit of letter-spacing.

Once we add some letter-spacing, it’s way more relaxed.
This can be a key regulation of typography: all the time letter-space your uppercase textual content. Why? As a result of except a font doesn’t have lowercase characters, it was designed for sentence-case studying, and characters in uppercase phrases will ALWAYS seem too cramped. (Moon is the particular exception right here—it solely has uppercase characters, and see how the letter-spacing is constructed into the font.)
We’ll assessment later, however to this point we’ve seen two issues that apply not simply to buttons, however to all components:
- Rounded fonts go higher with rounded shapes; squared-off fonts with squared-off shapes.
- Fonts designed for sentence case needs to be letter-spaced when utilized in phrases which might be all uppercase.
Let’s maintain shifting for now.
Seeing the plain default Sketch blue is annoying me. It’s begging to be become one thing that matches the typefaces we’re utilizing.
How can a coloration match a font? Nicely, I’ll hand it to you. This one is a bit extra loosey-goosey.
For our Moon button, we would like one thing a bit extra pleasant. To me, a staid blue says default, unstyled, reliable, takes-no-risks, design-by-committee. How do you inject some enjoyable into it?
Nicely, like all issues of modifying coloration, it helps to assume within the HSB coloration system (hue, saturation, and brightness). Once we boil coloration down to 3 intuitive numbers, we give ourselves levers to drag.
As an illustration, let’s take a look at hue. We’ve got two instructions we will push hue: all the way down to aqua or as much as indigo. Which sounds extra in step with Moon? To me, aqua does. A bit much less staid, a bit extra Caribbean sea. Let’s attempt it. We’ll transfer the hue to 180° or so.

Ah, Moon Button, now you’ve received a seaside vibe occurring. You’re a vibrant sea foam!
This can be a vital lesson about coloration. “Blue” shouldn’t be a monolith; it’s a place to begin. I’ve taught lots of of scholars UI design, and this comes up repeatedly: simply because blue was one coloration in kindergarten doesn’t imply that we will’t discover attention-grabbing variations round it as designers.
Aqua is a superb variation with a a lot cooler really feel, nevertheless it’s additionally a lot tougher to learn that white textual content. So now now we have one other downside to repair.
“Exhausting to learn” is definitely a numerically-specific property. The World Large Internet Consortium has printed pointers for distinction between textual content and background, and if we use a instrument to check these, we discover we’re missing in a pair departments.
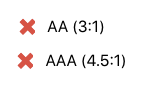
In keeping with Stark (which is my most popular Sketch plugin for checking distinction—try Lea Verou’s Distinction Ratio for the same web-based instrument), we’ve failed our distinction pointers throughout the board!
How do you make the white textual content extra legible in opposition to the aqua button? Let’s consider our HSB properties once more.
- Brightness. Let’s lower it. That a lot needs to be apparent.
- Saturation. We’re going to extend it. Why? As a result of we’re contrasting with white textual content, and white has a saturation of zero. So the next saturation will naturally stand out extra.
- Hue. We’ll depart this alone since we like its vibe. But when the distinction continued to be too low, you might decrease the aqua’s luminosity by shifting its hue up towards blue.
So now, we’ve received a teal button:

Significantly better?
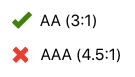
Significantly better.
For what it’s value, I’m not significantly involved about lacking the AAA commonplace right here. WCAG developed the degrees as relative descriptors of how a lot distinction there may be, not as an absolute benchmark of, say, some specific share of individuals to with the ability to learn the textual content. The gold commonplace is—as all the time—to check with actual individuals. AAA is greatest to hit, however at occasions, AA could also be nearly as good as you’re going to get with the colours you need to work with.
Among the concepts we’ve used to make a button’s blue a bit extra enjoyable and legible in opposition to white are literally deeper classes about coloration that apply to nearly every part else you design:
- Suppose in HSB, because it offers you intuitive levers to drag when modifying coloration.
- In the event you like the overall really feel of a coloration, shifting the hue in both path is usually a baseline for getting attention-grabbing variations on it (e.g., we wished to boost the default blue, however not by, say, altering it to pink).
- Modify saturation and brightness on the similar time (however all the time in reverse instructions) to extend or lower distinction.
OK, now let’s change over to our DIN button. What coloration goes with its harsh edges and squared-off really feel?
The very first thing that involves thoughts is black.

However let’s maintain brainstorming. Perhaps a stark pink would additionally work.

Or perhaps a construction-grade orange.

(However not the pink and orange collectively. Yikes! On the whole, two adjoining hues with excessive saturations won’t look nice subsequent to one another.)
Now, ignoring that the textual content of that is “Study Extra” and a button like this most likely doesn’t must be blaze orange, I would like you to concentrate to the colours I’m choosing. We’re attempting to keep up consistency with the official-y, squared-off DIN. So the colours we go to naturally have among the similar connotations: engineered, decisive, no humorous enterprise.
Positive, this match-a-color-and-a-font enterprise is extra subjective, however there’s one thing strong to it: observe that the phrases I used to explain the colours (“stark” and “construction-grade”) apply equally nicely to DIN—a reality I’m solely noticing now, not one thing completed deliberately.
Need to match a coloration with a font? That is one other lesson relevant to all of branding. It’s greatest to begin with adjectives/feelings, then match every part to these. Virtually by chance, we’ve uncovered one thing basic within the branding design course of.
Let’s shift gears to work with shadows for a bit.
There are a pair instructions we might go together with shadows, however the two principal classes are (for lack of higher phrases):
- practical shadows;
- and cartoon-y shadows.
Right here’s an instance of every:
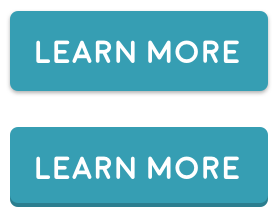
The highest button’s shadow is extra photorealistic. It behaves like a shadow in the true world.
The underside button’s shadow is a bit lower-fidelity. It exhibits that the button is raised up, nevertheless it’s a cartoon model, with a barely unrealistic, idealized backside edge—and and not using a regular shadow, which might be current in the true world.
The underside works higher for the button we’re crafting. The smoothness, the friendliness, the cartoon constancy—all of it goes collectively.
As for our DIN button?
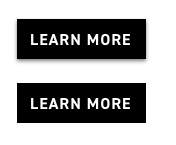
I’m extra ambivalent right here. Perhaps the shadow is for a hover state, à la Materials Design?
In any case, with a black background, a darkened backside edge is inconceivable—you possibly can’t get any darker than black.
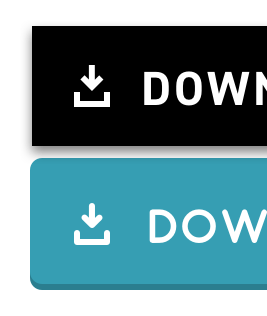
By the way in which, it’s possible you’ll not have seen it above, however the black button has a a lot stronger shadow. Evaluate:
The teal button’s shadow is 30%-opacity black, shifted 1 pixel down on the y-axis, with a 2-pixel blur (0 1px 2px). The black button’s is 50%-opacity black, shifted 2 pixels down on the y-axis, with a 4-pixel blur (0 2px 4px). What’s extra, the stronger shadow seems to be terrible on the teal button.

Why is that? The reply, like so many questions that contain coloration, is in luminosity. Once we put the button’s background in luminosity mix mode, changing it to a grey of equal pure lightness, we see one thing attention-grabbing.
The shadow, at its darkest, is mainly as darkish because the button itself. Or, a minimum of, the speed of change of luminosity is regular between every row of pixels.

The highest row is the button itself, not shadow.
Shadows which might be too near the luminosity of their ingredient’s backgrounds will seem too sturdy. And whereas this will likely sound like an excessively particular lesson, it’s really broadly relevant throughout components. You realize the place else you see it?
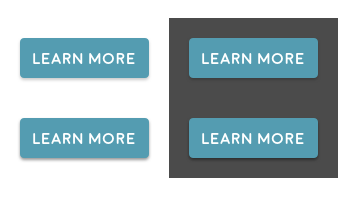
Let’s put a border on our teal button.

Now the way in which I’ve added this border is one thing {that a} bunch of individuals have considered: make the border translucent black in order that it really works on any background coloration. On this case, I’ve used a single-pixel-wide border of 20%-opacity black.
Nevertheless, if I change the background coloration to a extra commonplace blue, which is of course lots much less luminous, that border all however disappears.

The truth is, to see it on blue simply as a lot as you possibly can see it on teal, you’ve received to crank up black’s opacity to one thing like 50%.

This can be a generalizable rule: whenever you wish to layer black on one other coloration, it must be a extra opaque black to point out up the identical quantity on much less luminous background colours. The place else would you apply this concept?
Spoiler alert: shadows!
Every of those buttons has the identical shadow (0 2px 3px) besides for various opacities. The highest two buttons’ shadows have opacity 20%, and the underside two have opacity 40%. Observe how what’s advantageous on a white background (prime left) is hardly noticeable on a darkish background (prime proper). And what’s too darkish on a white background (decrease left) works advantageous on a darkish background (decrease proper).
I wish to change gears yet one more time and discuss icons.

Right here’s the obtain icon from Font Superior, my least favourite icon set of all time.

I dislike it, not solely as a result of it’s fully overused, but in addition as a result of the icons are actually bubbly and smooth. But more often than not, they’re utilized in clear, crisp web sites. They only don’t match.
You’ll be able to see it really works higher with a smooth, rounded font. I’m much less against this form of factor.

However there’s nonetheless an issue: the icon has these insanely small particulars! The dots are by no means going to point out up at dimension, and even the area between the arrow and the disk is a fraction of a pixel in apply. In comparison with the letterforms, it doesn’t seem like fairly the identical fashion.
However what good is my complaining if I don’t supply an answer?
Let’s create a brand new tackle the “obtain” icon, however with some totally different guiding rules:
- We’ll use a stroke weight that’s equal (or mainly equal) to the textual content weight.
- We’ll use nook radii which might be much like the nook radii of our font: squared off for DIN, rounded for Moon.
- We’ll use an easier icon form so the variations are straightforward to see.
Let’s see the way it seems to be:
I name this “drawing with the identical pen.” Every of those icons seems to be prefer it might mainly be a personality within the font used within the button. And that’s the purpose right here. I’m not saying all icons will seem this fashion, however for an icon that seems inline with textual content like this, it’s a incredible rule of thumb.
Now that is only the start. Buttons can take every kind of kinds.

However we’ve received a superb begin right here contemplating we designed simply two buttons. In doing so, we coated a bunch of the issues which might be focal factors of my day-to-day work as a UI designer:
- lighting and shadows;
- coloration;
- typography;
- consistency;
- and model.
And the teachings we’ve discovered in these areas are basic to the entirety of UI design, not only one ingredient. Recall:
- Letterforms are shapes. You’ll be able to analyze fonts as units of shapes, not merely as artistic endeavors.
- You must letter-space uppercase textual content, since most fonts have been designed for sentence case.
- Suppose in HSB to change colours.
- Yow will discover extra attention-grabbing variations on a “fundamental” coloration (like a CSS default shade of blue or pink) by tweaking the hue in both path.
- Saturation and brightness are levers which you could transfer in reverse instructions to regulate luminosity.
- Discover colours that match the identical descriptors that you’d give your typeface and your general model.
- Use darker shadows or black borders on darker backgrounds—and vice versa.
- For inline icons, select or design them to seem as if they have been drawn with the identical pen because the font you’re utilizing.
You’ll be able to thank Josh Waitzkin for making me a pedant. I do know, you simply learn a whole essay on buttons. However subsequent time you’re scuffling with a redesign and even one thing you’re designing from scratch, attempt stripping out all the weather that you simply assume try to be together with already, and simply fiddle with the best gamers on the board. Get a really feel for the basics, and go from there.
Bizarre? Positive. But when it’s ok for a grandmaster, I’ll take it.