Just lately, whereas making an attempt to implement a couple of completely different navigation concepts {that a} designer had thrown my means, I turned annoyed with my weak picture modifying expertise. The design was gradient-heavy, so a conventional strategy to navigation markup and styling would require a dozen or so background-image slices to satisfy the various colours and top necessities.
Article Continues Under
After spending a mortifying period of time creating the photographs—I’m a programmer by commerce, so something extra sophisticated than MS Paint offers me the willies—I needed to take a step again and determine a greater means. What if, after ending, I wanted to tweak the peak? Or, God forbid, the colour palette? My head was going to blow up if I needed to open a picture editor once more, so the Tremendous Simple Blendy Backgrounds approach was born.
Nearly all of the gradients within the design given to me had been blended to white, so I figured that if I created a PNG that was blended from clear to white, I might use the PNG as a background picture and depend on the background-color type to supply the opposite half of the mix.
I fired up my trusty picture editor and fumbled round till I had created two PNG pictures: a 100×100 px white-to-transparent mix, and a 100×100 px black-to-transparent mix. (I didn’t want the black for this utility, however I needed to see what it will appear to be.)
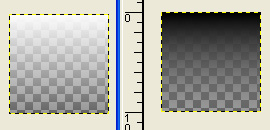
My two transparent-blend pictures, in-built The Gimp
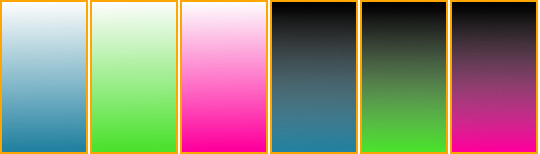
Utilizing these pictures, I rapidly threw collectively the CSS, and voila! Lovely blendy backgrounds. (IE6 customers, grasp on; we’ll get it working for you, we promise.)
Right here’s the CSS:
.blue {
  background-color: #2382a1;
}
.inexperienced {
  background-color: #4be22d;
}
.pink {
  background-color: #ff009d;
}
.gradwhite {
  background-image: url(grad_white.png);
}
.gradblack {
  background-image: url(grad_black.png);
}
.field {
  border: strong orange 2px;
  float: left;
  top: 100px;
  margin: 1px;
  width: 175px;
}
Right here’s the markup:
<div class="field gradwhite blue"></div>
<div class="field gradwhite inexperienced"></div>
<div class="field gradwhite pink"></div>
<div class="field gradblack blue"></div>
<div class="field gradblack inexperienced"></div>
<div class="field gradblack pink"></div>
On this instance and people who observe, we’re utilizing color-based type definitions to make the instance simpler to grasp—however everyone knows to not use presentation-specific phrases in our precise class names, proper? Proper.
Right here’s instance one, which produces this consequence:

A PNG gradient used as a background
Hey, it’s not scaling!#section3
After giving myself a congratulatory pat on the again, I attempted to scale that div to the dimensions that I needed. And, as you’ve most likely already discovered, the background gradient didn’t scale. Argh! I might power the background picture to repeat horizontally or vertically (utilizing repeat-x or repeat-y), however there was no strategy to scale the background. (See instance two if you wish to really feel the ache.)
CSS3 goes to implement a background-size attribute, however since CSS3 has an ETA of by no means, that’s no assist now. So what will we do? Nicely, we use one thing that will scale, just like the img component. As a substitute of utilizing a background to show the PNG mix, we will use an img component, and set the width and the top to 100%.
You possibly can test it out in instance three, which produces this consequence:
Profitable scaling—woohoo!
Right here’s the brand new CSS (overwriting what we had earlier than):
.blue {
  background-color: #2382a1;
}
.inexperienced {
  background-color: #4be22d;
}
.pink {
  background-color: #ff009d;
}
.gradwhite img, .gradblack img {
  background-color: clear;
  top: 100%;
  left: 0px;
  place: absolute;
  prime: 0px;
  width: 100%;
}
.box2 {
  border: strong orange 2px;
  float: left;
  top: 150px;
  margin: 1px;
  place:relative;
  width: 84px;
}
Right here’s the markup:
<div class="box2 gradwhite blue">
  <img src="https://alistapart.com/grad_white.png"/>
</div>
<div class="box2 gradwhite inexperienced">
  <img src="https://alistapart.com/grad_white.png"/>
</div>
<div class="box2 gradwhite pink">
  <img src="https://alistapart.com/grad_white.png"/>
</div>
<div class="box2 gradblack blue">
  <img src="/grad_black.png"/></div>
<div class="box2 gradblack inexperienced">
  <img src="/grad_black.png"/>
</div>
<div class="box2 gradblack pink">
  <img src="/grad_black.png"/>
</div>
The picture is exhibiting up on prime of my textual content! What offers?#section4
Now that now we have these candy blendy backgrounds, let’s attempt to put some textual content in them. The very first thing we have to do is make the bins scale when the consumer resizes the textual content. We’ll do this by dropping the top declaration after which including a conditional remark as a favor to IE7, which apparently appears to be like to the dad or mum component for a top if none is specified. You possibly can learn extra about conditional feedback at Quirksmode.
Observe: In actual life, you’d most likely need to merely embrace a CSS file that targets a compliant browser like Firefox after which embrace two extra (utilizing conditional feedback that concentrate on IE6 and IE7). However for now, right here’s that remark:
<!--[if IE 7]>
<type kind="textual content/css">.field {
  border: strong purple 2px;
  top:2.5em;
}
</type>
<![endif]-->
Textual content exhibiting up behind the PNG gradient
You possibly can observe the try in progress in instance 4. The completely positioned picture is exhibiting up in entrance of the textual content. To right that, we use the common selector to pick out any descendents of .gradwhite, place them comparatively (higher specificity might, in fact, override this as vital), and provides them a z-index of 1. Giving the img a z-index of 0 then retains it from popping to the floor. Whereas we’re at it, we’ll add a little bit type to the paragraphs to set them off.

Textual content accurately showing in entrance of the PNG gradient
Instance 5 does the trick. Right here’re the brand new and up to date guidelines:
.gradwhite img, .gradblack img {
  top: 100%;
  left: 0px;
  place: absolute;
  prime: 0px;
  width: 100%;
  z-index:0;
}
.gradwhite * {
  place: relative;
  z-index: 1;
}
.gradwhite p {
  margin: 0px;
  padding: 3px;
}
.box3 {
  border: strong orange 2px;
  float: left;
  margin: 1px;
  padding: 5px;
  place:relative;
  width: 256px;
}
And right here’s the markup:
<div class="box3 gradwhite pink">
  <img src="https://alistapart.com/grad_white.png"/>
  <p>This textual content is in entrance of the picture.</p>
</div>
Do you notice none of this works in IE6?#section5
Everyone knows that IE6 and prior variations don’t assist PNG transparencies. And since IE7 received’t have the bulk market share for awhile, you’re most likely considering that this can be a nice train in one thing your boss won’t ever allow you to use, proper? Nicely, IE has this nice little factor known as the AlphaImageLoader filter, which is defined in ALA’s “Cross-Browser Variable Opacity with PNG: A Actual Resolution.” The pertinent half is which you could load a PNG picture and set the filter to “scale,” thus eliminating (for IE) the necessity for the workarounds we used for Firefox.
So how will we make this work in each IE and Firefox on the identical time? Nicely, we will goal our kinds for Firefox, after which use the star-HTML hack to override them for IE6. I’m utilizing the star-CSS hack right here extra within the curiosity of readability than the rest; I believe it helps to see all the pieces collectively, plus it’s simpler to chop and paste. After I use this system in a manufacturing surroundings, I want to make use of conditional feedback to focus on browsers. In spite of everything, hacks are hacks, they usually aren’t assured to work in perpetuity.

Approach working in IE6
Instance six places all of it collectively. Right here’s the CSS so as to add. (Line wraps marked » —Ed.)
.gradwhite {
  filter: progid:DXImageTransform.Microsoft. »
AlphaImageLoader(src="https://alistapart.com/article/supereasyblendys/grad_white.png", »
sizingMethod='scale');
}
* html .gradwhite img {
  show:none;
}
And right here’s the markup. (Don’t stare too lengthy on the ugly inline kinds—they’ll be gone in only a second.)
<div class="field gradwhite pink">
    <p>Wow, perhaps this can truly work!
    </p>
</div>
Wrapping all the pieces up#section6
Lastly, we’ll add yet another star-HTML rule (place:static utilized to the field class) to take care of a nasty IE6 bug that retains hyperlinks from working with AlphaImageLoader in sure circumstances.
Instance seven reveals our remaining cross-browser Tremendous-Simple Blendy backgrounds, which appear to be this:

Tremendous-easy blendys in all their glory
Right here’s the ultimate CSS in its entirety. (Line wraps marked » —Ed.)
<type kind="textual content/css">.grad img {
  top: 100%;
  left: 0px;
  place: absolute;
  prime: 0px;
  width: 100%;
  z-index: 0;
}
.field {
  border: strong orange 2px;
  float: left;
  margin: 1px;
  place: relative;
  width: 165px;
  padding: 5px;
}
.field * {
  margin: 0px;
  place: relative;
  z-index: 1;
}
* html .grad {
  filter: progid:DXImageTransform.Microsoft.AlphaImage »
Loader (src="https://alistapart.com/article/supereasyblendys/grad_white.png", sizingMethod='scale');
}
* html .grad img {
  show: none;
}
* html .field {
    place:static;
}
.blue {
  background-color: #2382a1;
}
.inexperienced {
  background-color: #4be22d;
}
.pink {
  background-color: #ff009d;
}
</type><!--[if IE 7]>
<type kind="textual content/css">
.field {
  border: strong purple 2px;
  top:2.5em;
}
</type>
<![endif]-->
The ultimate markup:
<div class="field grad blue">
  <img src="https://alistapart.com/article/supereasyblendys/grad_white.png" alt="blur gradient field" />
  <p><a href="#">Ooo, linked textual content</a>!</p></div>
<div class="field grad pink">
  <img src="https://alistapart.com/article/supereasyblendys/grad_white.png" alt="pink gradient field" />
  <p><a href="#">Ooo, linked textual content!
</div>
<div class="field grad inexperienced">
  <img src="https://alistapart.com/article/supereasyblendys/grad_white.png" alt="inexperienced gradient field" />
  <p><a href="#">Ooo, linked textual content</a>!</p>
</div>
That’s it! In Half Two of this two-part collection, I’ll clarify methods to work this system into visually subtle layouts.