I keep in mind January 10, 2010, slightly effectively: it was the day we misplaced a undertaking’s full historical past. We have been utilizing Subversion as our model management system, which saved the undertaking’s historical past in a central repository on a server. And we have been backing up this server regularly—not less than, we thought we have been. The server broke down, after which the backup failed. Our undertaking wasn’t utterly misplaced, however all of the historic variations have been gone.
Article Continues Under
Shortly after the server broke down, we switched to Git. I had all the time seen model management as torturous; it was too advanced and never helpful sufficient for me to see its worth, although I used it as a matter of obligation. However as soon as we’d spent a while on the brand new system, and I started to know simply how useful Git could possibly be. Since then, it has saved my neck in lots of conditions.
In the course of the course of this text, I’ll stroll via how Git may help you keep away from errors—and learn how to recuperate in the event that they’ve already occurred.
Each teammate is a backup#section2
Since Git is a distributed model management system, each member of our staff that has a undertaking cloned (or “checked out,” when you’re coming from Subversion) routinely has a backup on his or her disk. This backup accommodates the most recent model of the undertaking, in addition to its full historical past.
Which means ought to a developer’s native machine and even our central server ever break down once more (and the backup not work for any purpose), we’re up and operating once more in minutes: any native repository from a teammate’s disk is all we have to get a completely purposeful alternative.
Branches preserve separate issues separate#section3
When my extra technical colleagues instructed me about how “cool” branching in Git was, I wasn’t bursting with pleasure straight away. First, I’ve to confess that I didn’t actually perceive some great benefits of branching. And second, coming from Subversion, I vividly remembered it being a posh and error-prone process. With some dangerous recollections, I used to be anxious about working with branches and subsequently tried to keep away from it every time I may.
It took me fairly some time to know that branching and merging work utterly in another way in Git than in most different techniques—particularly relating to its ease of use! So when you discovered the idea of branches from one other model management system (like Subversion), I like to recommend you neglect your prior data and begin contemporary. Let’s begin by understanding why branches are so necessary within the first place.
Why branches are important#section4
Again within the days after I didn’t use branches, engaged on a brand new characteristic was a multitude. Primarily, I had the selection between two equally dangerous workflows:
(a) I already knew that creating small, granular commits with just a few modifications was an excellent model management behavior. Nevertheless, if I did this whereas creating a brand new characteristic, each commit would mingle my half-done characteristic with the primary code base till I used to be performed. It wasn’t very nice for my teammates to have my unfinished characteristic introduce bugs into the undertaking.
(b) To keep away from getting my work-in-progress combined up with different matters (from colleagues or myself), I’d work on a characteristic in my separate area. I’d create a replica of the undertaking folder that I may work with quietly—and solely commit my characteristic as soon as it was full. However committing my modifications solely on the finish produced a single, big, bloated commit that contained all of the modifications. Neither my teammates nor I may perceive what precisely had occurred on this commit when it later.
I slowly understood that I needed to make myself acquainted with branches if I wished to enhance my coding.
Working in contexts#section5
Any undertaking has a number of contexts the place work occurs; every characteristic, bug repair, experiment, or different of your product is definitely a context of its personal. It may be seen as its personal “matter,” clearly separated from different matters.
If you happen to don’t separate these matters from one another with branching, you’ll inevitably enhance the chance of issues. Mixing completely different matters in the identical context:
- makes it exhausting to maintain an outline—and with quite a lot of matters, it turns into nearly unimaginable;
- makes it exhausting to undo one thing that proved to comprise a bug, as a result of it’s already mingled with a lot different stuff;
- doesn’t encourage folks to experiment and take a look at issues out, as a result of they’ll have a tough time getting experimental code out of the repository as soon as it’s combined with secure code.
Utilizing branches gave me the arrogance that I couldn’t mess up. In case issues went improper, I may all the time return, undo, begin contemporary, or change contexts.
Branching fundamentals#section6
Branching in Git really solely entails a handful of instructions. Let’s have a look at a primary workflow to get you began.
To create a brand new department based mostly in your present state, all you must do is choose a reputation and execute a single command in your command line. We’ll assume we need to begin engaged on a brand new model of our contact kind, and subsequently create a brand new department referred to as “contact-form”:
$ git department contact-form
Utilizing the git department command and not using a title specified will checklist the entire branches we at present have (and the “-v” flag supplies us with somewhat extra information than common):
$ git department -v

You may discover the little asterisk on the department named “grasp.” This implies it’s the at present lively department. So, earlier than we begin engaged on our contact kind, we have to make this our lively context:
$ git checkout contact-form
Git has now made this department our present working context. (In Git lingo, that is referred to as the “HEAD department”). All of the modifications and each commit that we make any longer will solely have an effect on this single context—different contexts will stay untouched. If we need to change the context to a distinct department, we’ll merely use the git checkout command once more.
In case we need to combine modifications from one department into one other, we are able to “merge” them into the present working context. Think about we’ve labored on our “contact-form” characteristic for some time, and now need to combine these modifications into our “grasp” department. All we now have to do is change again to this department and name git merge:
$ git checkout grasp
$ git merge contact-form
Utilizing branches#section7
I’d strongly counsel that you just use branches extensively in your day-to-day workflow. Branches are one of many core ideas that Git was constructed round. They’re extraordinarily low-cost and simple to create, and easy to handle—and there are many assets on the market when you’re able to be taught extra about utilizing them.
There’s one factor that I’ve discovered as a programmer through the years: errors occur, irrespective of how skilled individuals are. You possibly can’t keep away from them, however you’ll be able to have instruments at hand that provide help to recuperate from them.
One in every of Git’s biggest options is you could undo nearly something. This offers me the arrogance to check out issues with out concern—as a result of, to this point, I haven’t managed to actually break one thing past restoration.
Amending the final commit#section9
Even when you craft your commits very rigorously, it’s all too simple to neglect including a change or mistype the message. With the --amend flag of the git commit command, Git permits you to change the final commit, and it’s a quite simple repair to execute. For instance, when you forgot so as to add a sure change and in addition made a typo within the commit topic, you’ll be able to simply appropriate this:
$ git add some/modified/information
$ git commit --amend -m "The message, this time with out typos"
There’s just one factor it is best to take into account: it is best to by no means amend a commit that has already been pushed to a distant repository. Respecting this rule, the “amend” possibility is a good little helper to repair the final commit.
(For extra element concerning the amend possibility, I like to recommend Nick Quaranto’s glorious walkthrough.)
Undoing native modifications#section10
Adjustments that haven’t been dedicated are referred to as “native.” All of the modifications which can be at present current in your working listing are “native” uncommitted modifications.
Discarding these modifications could make sense when your present work is… effectively… worse than what you had earlier than. With Git, you’ll be able to simply undo native modifications and begin over with the final dedicated model of your undertaking.
If it’s solely a single file that you just need to restore, you need to use the git checkout command:
$ git checkout -- file/to/restore
Don’t confuse this use of the checkout command with switching branches (see above). If you happen to use it with two dashes and (separated with an area!) the trail to a file, it should discard the uncommitted modifications in a given file.
On a nasty day, nonetheless, you may even need to discard all of your native modifications and restore the whole undertaking:
$ git reset --hard HEAD
This may exchange the entire information in your working listing with the final dedicated revision. Simply as with utilizing the checkout command above, this can discard the native modifications.
Watch out with these operations: since native modifications haven’t been checked into the repository, there is no such thing as a strategy to get them again as soon as they’re discarded!
Undoing dedicated modifications#section11
In fact, undoing issues just isn’t restricted to native modifications. You may as well undo sure commits when crucial—for instance, when you’ve launched a bug.
Principally, there are two primary instructions to undo a commit:
(a) git reset#section12
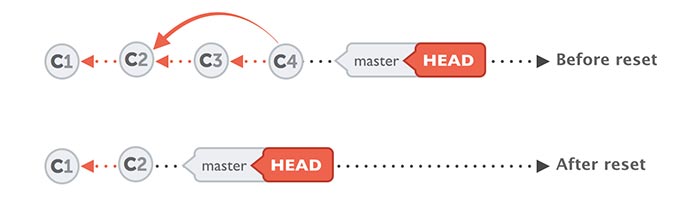
The git reset command actually turns again time. You inform it which model you need to return to and it restores precisely this state—undoing all of the modifications that occurred after this cut-off date. Simply present it with the hash ID of the commit you need to return to:
$ git reset -- exhausting 2be18d9
The --hard possibility is the best and cleanest method, but it surely additionally wipes away all native modifications that you just may nonetheless have in your working listing. So, earlier than doing this, ensure there aren’t any native modifications you’ve set your coronary heart on.
(b) git revert#section13
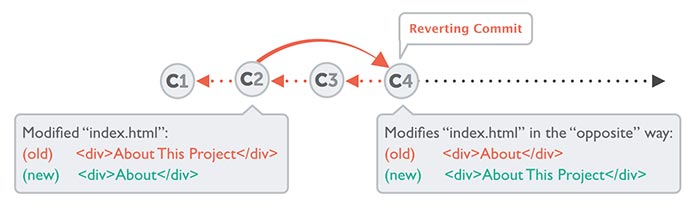
The git revert command is utilized in a distinct situation. Think about you may have a commit that you just don’t need anymore—however the commits that got here afterwards nonetheless make sense to you. In that case, you wouldn’t use the git reset command as a result of it could undo all these later commits, too!
The revert command, nonetheless, solely reverts the results of a sure commit. It doesn’t take away any commits, like git reset does. As a substitute, it even creates a new commit; this new commit introduces modifications which can be simply the other of the decide to be reverted. For instance, when you deleted a sure line of code, revert will create a brand new commit that introduces precisely this line, once more.
To make use of it, merely present it with the hash ID of the commit you need reverted:
$ git revert 2be18d9
On the subject of discovering bugs, I have to admit that I’ve wasted fairly a while stumbling at midnight. I typically knew that it used to work a few days in the past—however I had no concept the place precisely issues went improper. It was solely after I discovered about git bisect that I may pace up this course of a bit. With the bisect command, Git supplies a device that helps you discover the commit that launched an issue.
Think about the next scenario: we all know that our present model (tagged “2.0”) is damaged. We additionally know that a few commits in the past (our model “1.9”), every thing was tremendous. The issue will need to have occurred someplace in between.
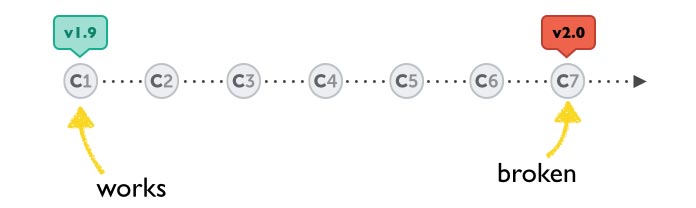
That is already sufficient data to begin our bug hunt with git bisect:
$ git bisect begin
$ git bisect dangerous
$ git bisect good v1.9
After beginning the method, we instructed Git that our present commit accommodates the bug and subsequently is “dangerous.” We then additionally knowledgeable Git which earlier commit is unquestionably working (as a parameter to git bisect good).
Git then restores our undertaking within the center between the recognized good and recognized dangerous circumstances:
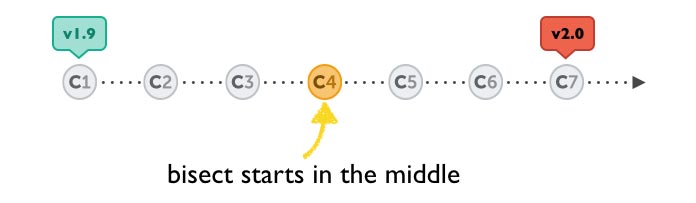
We now check this model (for instance, by operating unit exams, constructing the app, deploying it to a check system, and many others.) to search out out if this state works—or already accommodates the bug. As quickly as we all know, we inform Git once more—both with git bisect dangerous or git bisect good.
Let’s assume we stated that this commit was nonetheless “dangerous.” This successfully implies that the bug will need to have been launched even earlier—and Git will once more slim down the commits in query:
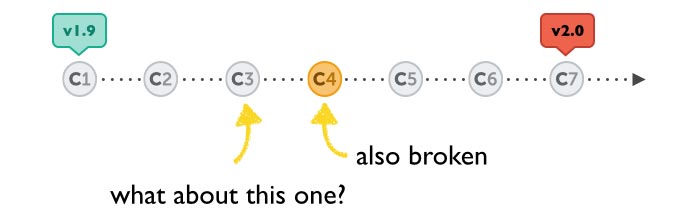
This fashion, you’ll discover out in a short time the place precisely the issue occurred. As soon as this, it is advisable name git bisect reset to complete your bug hunt and restore the undertaking’s unique state.
A device that may save your neck#section15
I have to confess that my first encounter with Git wasn’t love at first sight. At first, it felt identical to my different experiences with model management: tedious and unhelpful. However with time, the observe grew to become intuitive, and gained my belief and confidence.
In any case, errors occur, irrespective of how a lot expertise we now have or how exhausting we attempt to keep away from them. What separates the professional from the newbie is preparation: having a system in place you could belief in case of issues. It helps you keep up to the mark, particularly in advanced initiatives. And, in the end, it helps you turn into a greater skilled.