A be aware from the editors: This text, an enchanting glimpse into the unusual wishes of mid-2000s net designers, is now out of date.
A couple of weeks in the past, whereas strolling by means of the gorgeous Sussex countryside, I made a decision I wished to discover a solution to automate text-wrapping round photos with irregular outlines.
Article Continues Under
Critically, I have to get out extra. This text is the results of that ramble by means of the hills.
The idea is straightforward. We need to create a collection of “sandbag” divs that we’ll lay over our picture; it is going to be these sandbags and never the precise picture that the textual content will move round. However we don’t actually need to try this ourselves: we need to get PHP to do it for us.
Step 1: Understanding the scale of the sandbags#section3
We’ll start by creating an array with the sizes and positions of our “excellent” sandbags. Our “excellent” sandbags could be solely 1px excessive to permit for the smoothest textual content move; working these out manually could be absurd, so let’s discover a approach that works!
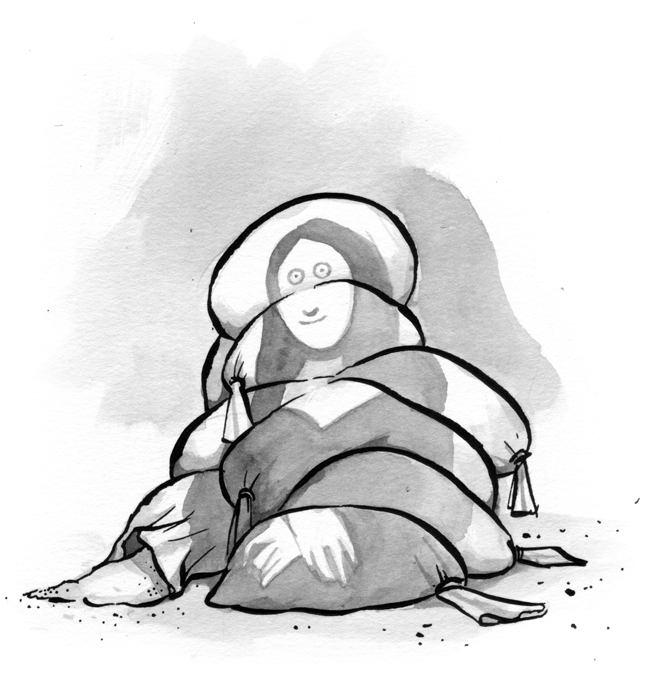
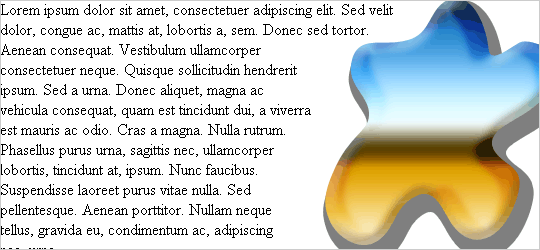
Our pattern picture, which we need to right-align, presently appears to be like like this:
Our pattern picture, with left-aligned textual content.
Taking a look at our picture, I understand how I’d measurement up the sandbags by eye, and that’s precisely what we’re going to do with PHP. We scan alongside from left to proper, if we hit a clear pixel we predict “ooh, let’s go a bit additional;” if we hit a stable pixel we are saying “righto, that’s the place that sandbag must be.” Then we’ll go right down to the following row of pixels and repeat this course of till we hit the underside of the picture.
To place it a tad extra technically, we wish a loop that scrolls by means of the Y axis, beginning at 0 and ending on the peak of the picture. For every row, we’ll scroll by means of the X axis, beginning at 0 and ending on the width of the picture. Every time we hit a clear pixel, we’re going so as to add 1 to the array for that row. Once we hit a non-transparent pixel, we’re going to interrupt out of our X loop and go to the following row of pixels. To place it much more technically, that interprets to the next code (line wraps marked » —Ed.):
<?php$picture  = imagecreatefrompng( 'an_image.png' );
$width  = imagesx( $picture );
$peak = imagesy( $picture );for ( $y=0; $y < $peak; $y++ ){
  $imagemap[$y] = 0;
  for ( $x=0; $x < $width; $x++ ){
    $c = imagecolorsforindex( $picture, »
imagecolorat( $picture, $x, $y ) );
    if ( $c['alpha'] < 127 ){
      break;
    } else {
      $imagemap[$y]++;
    }
  }
}?>
Phew—absolutely that’s one of many hardest bits out of the way in which. The imagecolorsforindex operate right here is nice isn’t it? It returns an array of the purple, inexperienced, blue, and alpha elements. If the alpha part of any given pixel is lower than 127, then the pixel isn’t absolutely clear.
Positioning our luggage#section4
The CSS we’re utilizing is fairly minimal. Nevertheless it seems that Web Explorer doesn’t like having a div solely 1px excessive, so we’d like a bit little bit of trickery. To maintain IE pleased with our 1px excessive sandbags we use the next CSS:
.sandbag-right {
  border: 0;
  padding: 0;
  font-size: 0;
  margin: 0 0 -1px 0;
  peak: 2px;
  float: proper;
  clear: proper;
  background: purple;
}
By setting the font-size to zero, we are able to obtain 2px-high divs. If we then throw in a damaging backside margin of 1px earlier than IE actually notices what’s occurring, we are able to make them seem like 1px excessive. Bingo.
(The purple background is simply so we are able to see the sandbags at this stage; we’ll be eradicating this later.)
Laying down the sandbags#section5
We’ve now bought every little thing in place, so let’s create these sandbags. This requires a easy foreach loop by means of our $imagemap array. To get the width of our sandbag, we have to keep in mind it’s not the worth we’ve already calculated that we wish, as that’s really the scale of the empty area subsequent to the sandbag. The precise width of our sandbag is the width of the picture minus the worth in our array.
We’re going to make use of the printf operate to echo our sandbags right into a template. It will make issues neater in the long term. (line wraps marked » —Ed.)
<?php$sandbagTemplate="
";foreach ( $imagemap as $place => $blankPixels ){
  $sandbagWidth = $width-$blankPixels;
  printf( $sandbagTemplate,$sandbagWidth );
}?>
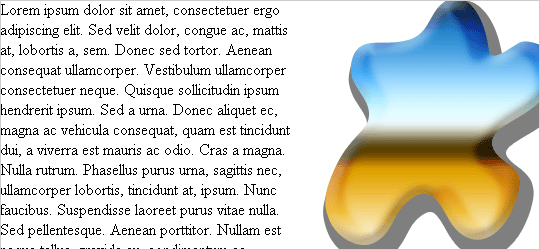
Step 1: The text-wrap to this point.
You possibly can try the code for the 1st step.
Step 2: An excessive amount of of a very good factor…#section6
Now we have now an array that lets us generate an ideal collection of sandbags. After a little bit of testing, we see, considerably annoyingly, that Opera appears to be the one browser during which these “excellent” sandbags work as anticipated. In most different browsers, we discover that our textual content disobediently overlaps our sandbags.
I attempted taking part in round with numerous margin sizes, however this simply didn’t minimize the mustard. Lastly, I reluctantly concluded that we would have liked less-perfect sandbags. Greater than 1px. However how massive? Properly, let’s depart that as much as the consumer. I discovered that 10px to 50px appeared to work fairly properly, however it might properly differ, so we’ll depart it versatile within the operate.
Though we’ve discovered how one can trick IE into permitting us to have these 1px-high sandbags, there’s probably not a lot level in the event that they don’t work, and our operate turns into a lot neater if we implement a 2px-high minimal. It was upsetting to lose this neat trick, however I took a deep breath and disallowed 1px-high sandbags from the operate. (Don’t be unhappy, this information will turn out to be useful afterward.)
Lower than excellent#section7
Now we need to loop by means of that “excellent” array we generated earlier. If we have now a sandbag peak of 10px, we might need to take a look at the array in clusters of 10, taking the most important sandbag from every cluster after which outputting that worth into a brand new array. After all, slightly than utilizing a relentless quantity, we’ll simply use our variable $sandbagHeight.
The biggest sandbag from every part is definitely the one with the smallest worth within the array (because the array represents the clear useless area and never the precise sandbag), so we’ll use the useful PHP operate min to return the bottom worth from the array.
The ensuing loop appears to be like like this:
for( $i=0;$i < depend($imagemap ); $i = $i+$sandbagHeight) {
  for( $x=0; $x < $sandbagHeight; $x++ ){
    $b = $x + $i;
    if( isset( $imagemap[$b] ) ){
      $part[$b] = $imagemap[$b];
    }
  }
  $sandbag[] = min( $part );
  unset( $part );
}
We additionally have to set the peak of every sandbag. We’ll try this by including it to our sandbag template (line wraps marked » —Ed.):
$sandbagTemplate="
";
We’re going to need the potential for including some additional padding above the primary sandbags and under the final sandbag, and we are able to simply isolate the primary and final merchandise of the array and append an extra type to those as required.
If we now use our $sandbag array as a substitute of our $imagemap array to generate the sandbags we get the next:
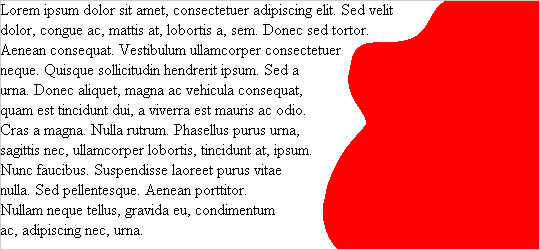
Step 2: Sandbags sans our pattern picture.
You possibly can see how the code is wanting in step two.
Step 3: Inserting the picture behind the sandbag#section8
We’re on the homestretch now. We’ve bought the sandbags. All we have to do now could be stick the picture behind them. What may very well be less complicated?
All we do is… ur… no, wait… we simply…
… oh. Oh expensive. This was meant to be the simple bit, and taking a look at it now it seems it’s fairly an enormous hill.
I’d at all times simply imagined I’d both a) have the ability to simply give the encompassing div a background picture or b) really use an img.
The issue is, the second we give the encompassing div a selected measurement with a purpose to give it a background picture, the textual content begins to wrap across the div. It overpowers our sandbags. The identical goes for placing an img in there. I attempted taking part in round with z-index layers, however each time I believed it was going to work, it fell aside in a single browser or one other. For the longest time, this had me totally stumped.
We’ve bought our sandbags and so they work… it’s simply we are able to’t appear to place anything in entrance of our sandbags with out destroying their performance…
Utilizing what we’ve bought#section9
… so let’s not put anything in entrance of the sandbags.
That is the place some radical considering is available in.
Let’s use the precise sandbags themselves. Why not simply give every sandbag the identical background picture and place that background picture relative to every sandbag’s place.
Does it work? Oh sure it does.
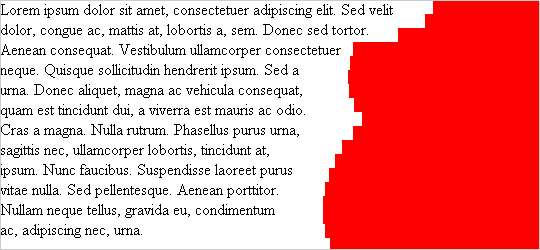
Step 3: Sandbags with the pattern picture in place.
Right here’s the code for step three.
Step 4: Including a pseudo alt attribute#section10
We’ve now bought a working operate, however we have now to simply accept that we’ve misplaced a bit little bit of accessibility in doing this. Worry not, we are able to add pseudo alt and title attributes to the picture. We’ll set these from the operate, and put this new variable in an outer div as a title. We’ll additionally throw it in there as a hidden span earlier than the primary sandbag. That means if we flip off the stylesheet we get our alt textual content, and if we hover over wherever on the picture we get our title attribute.
We’re additionally going so as to add a no-repeat to the background, which suggests we by no means get the highest of the picture repeating once more within the remaining sandbag.
Our stylesheet now appears to be like like this:
.sandbagImage span {
  show: none;
}.sandbagRight {
  border: 0;
  padding: 0;
  font-size: 0;
  margin: 0 0 0 25px;
  float: proper;
  clear: proper;
  background: no-repeat;
}</type>
Once we create the outer div we’re going to make use of the next code give us the choice of together with an alt attribute:
if($alt != ''){
  echo '
‘; }
(You don’t have to see the code for this, because it’s a minor tweak.)
Step 5: Preserving Safari glad#section11
There’s a struggle brewing right here between two browser “constraints” that face us right here.
In Safari, that “no-repeat” we added doesn’t work the place there may be damaging background positioning, and so if the ultimate sandbag is just too massive, we get the highest of the picture repeating within the remaining sandbag. That’s not good.
So what we are able to do is calculate the scale of every sandbag as we add it to the array. The ultimate time the variable is about would be the measurement of the ultimate sandbag. We try this by including a easy “depend” to our second loop:
for( $i=0;$i < depend( $imagemap ); $i = $i+$sandbagHeight ){
  for( $x=0;$x < $sandbagHeight; $x++ ){
    $b = $x + $i;
    if( isset( $imagemap[$b] ) ){
      $part[$b] = $imagemap[$b];
    }
  }
  $sandbag[] = min( $part );
  $finalSectionSize = depend( $part )-1;
  unset( $part );
}
Step 4: Safari-friendly sandbags.
Check out the code for step 4.
Preserving IE glad#section12
However we nonetheless can’t drop that no-repeat. Why not? Properly…
Let’s suppose we have now a picture that’s 121px excessive, cut up into 10px-high sandbags. Our remaining sandbag goes to be 1px excessive.
However as we all know, in Web Explorer we are able to’t have 1px excessive divs with out some CSS hacking. If we give the ultimate sandbag a damaging backside margin, we’re then going to need to undergo a palaver of including an additional “kém chất lượng” sandbag to re-establish our backside margin if required. We don’t need to do that.
That no-repeat nonetheless must be there as a result of on this state of affairs it might consequence within the prime row of pixels within the picture being repeated on the backside.
Aaaand the code for step 5.
Step 6: Permitting for left-alignment#section13
The operate as I’ve defined it solely permits for proper aligning. To left-align, we have now to maintain just a few easy issues in thoughts:
- The CSS for our sandbags ought to float and clear left, not proper.
- When looping by means of our preliminary array we work from proper to left, so we begin on the width of the picture and finish at 0, subtracting from x every time as a substitute of including to it.
- The x axis of the background place is at all times 0px.
I received’t stroll by means of these steps, however…
Our remaining operate#section14
…we are able to mix every little thing collectively into one remaining superb operate together with the choice for left-alignment, our previous few bits of cross-browser fixing, and a few error checking. The ultimate operate is straightforward to name (line wraps marked » —Ed.):
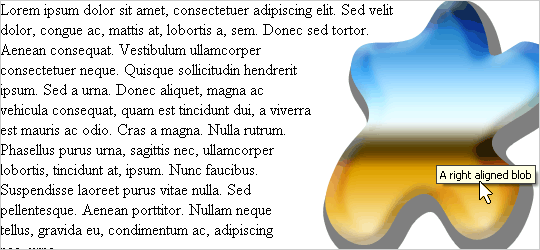
<?php alignedImage( 'an_image.png', 'proper', »
'A proper aligned blob',30 ); ?>
You possibly can see the code for the ultimate operate: step six. Yay!