A be aware from the editors: The methods demonstrated on this tutorial should not for everybody. The design technique works its magic by nesting divs that haven’t any semantic or structural worth. If that bothers you (and there are good the explanation why it’d), this isn’t the tutorial for you. Then again, for those who want to create visible results that broaden and contract to suit any object, require no picture manipulation, and render the identical throughout all browsers, then “Onion Skinned Drop Shadows” could also be simply what you’ve been searching for.
Onion skinned drop shadows? Sure, onion skinned. Animators use onion skinning to render what’s unimaginable to see in any other case: a snapshot of movement throughout time. Now, internet designers can use it to render one other seeming impossibility: the actually extensible CSS-based dropshadow.
Article Continues Under
Uninterested in studying approach after approach outlining the various methods to pores and skin this cat? Simply think about this an illustration of the capability of CSS to shock. Simply when it appears to be like as if the strategy is obvious and the best way is outlined, another wandering thoughts reveals one other artistic method. If all you glean from this text is a deeper appreciation for the variety of options CSS affords, you then’ve benefited excess of anybody techniquecould ship. Learn on.
There are a number of variations between this method and people provided beforehand, each right here and elsewhere. Some might discover it easier than others, some extra steady; however irrespective of the way you have a look at it, it’s extra extensible. With only one set of easy guidelines, these new drop shadows:
- Routinely broaden and contract to suit any object, with out specifying widths.
- Let you modify the shadow depth with no picture manipulation.
- Render the identical throughout all browsers with out chopping any corners.
Onion skinning refers to a way in time-based arts of overlaying a number of frames in a sequence to discern the delicate variations between them. The animator is just wanting by means of a stack of layers to see one complete movement by means of a composite of its components. What’s opaque on one layer could be seen by means of the clear areas on a layer above it. We are able to do the identical factor with divs. Utilizing CSS, we will stack divs collectively in concentric vogue, just like the layers of an onion, to kind a composite of something we like. In the present day, we’re making drop shadows.
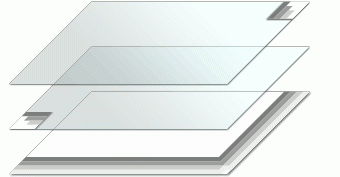
Isometric view of an onion skinned drop shadow:#section5
![]()
Three divs, every containing a unique shadow picture element (illustration), overlay each other to kind a composite drop shadow. The markup couldn’t be easier. Simply wrap your object inside three divs, one inside the opposite, and provides every a category identify which corresponds to its position. Since we’re “wrapping” the article, the courses we’ll assign for demonstration functions are named wrap1, wrap2, and wrap3 (.wrap1 assigned to the outer, and .wrap3 the innermost div).

The CSS is a little more sophisticated — however not a lot. There are principally three issues that the fashion guidelines should accomplish for the shadow:
- Make it present. Assign every of the three shadow picture elements (shadow + two corners) to a unique layer within the onion pores and skin stack.
- Make it drop. Create an offset which strikes the drop shadow down, and to the suitable of the article.
- Make it shrink-to-fit. Power the
divs surrounding the article to break down upon it.
The first step: rendering the shadow#section6
The essential concept is to assign one of many three shadow picture elements to every of the divs by means of its corresponding class. The sequence of which div will get which element is essential, although. The aim for having three picture elements is to make use of the 2 small ones on the top-right and bottom-left positions to masks the clipped edges of the massive shadow revealing solely comfortable, rounded edges throughout.
To ensure that one picture to masks one other, it should reside above it within the z-index. We don’t have to fret a lot about indexing the stack, for the reason that nested construction of our divs carry’s an intrinsic stacking order that works for us. We merely assign the category with the shadow to the outermost div on the backside of the stack. Because the divs inside it should naturally sit on high, we’ll give the courses with the nook photographs to them.
.wrap1 {
  background-image:url(shadow.gif);
  }
.wrap2 {
  background-image:url(corner_bl.gif);
  }
.wrap3 {
  background-image:url(corner_tr.gif);
  }
As soon as we’ve assigned the suitable photographs to the suitable courses, we have to give them place — background-position, that’s. If we left the principles alone at this level, all we might see is a tiled background of “corner_tr.gif” because it’s sitting highest within the stacking order. Keep in mind, onion skinning requires transparency within the higher layers in order that we will see what’s beneath. To do that, we’ll cancel the repeating property of all of the background photographs with no-repeat, and place them the place they belong to kind the composite of our drop shadow.
Widespread sense tells us that a picture named “corner_tr.gif” ought to reside in a nook — most likely the top-right; ditto for “corner_bl.gif” (bottom-left). However, what in regards to the giant shadow picture? Does it even want place? Sure — greater than another, in truth. If we would like our shadow to fall to the bottom-right of no matter object we put it beneath, we should specify that route in our .wrap1 rule. In any other case, it should mechanically fill the div relative to its top-left nook, the other of what we want.
The bottom layer: div.wrap1#section7
The outermost div holds the most important of the three shadow elements, which is positioned proper backside.
.wrap1 {
  background:url(shadow.gif) proper »
  backside no-repeat;
  }
The center layer: div.wrap2#section8
The second div, nested inside the primary, masks the clipped lower-left nook of the shadow beneath, giving it a rounded look.
.wrap2 {
  background:url(corner_bl.gif) left »
  backside no-repeat;
  }
The interior layer: div.wrap3#section9
The third div, nested contained in the second, takes care of the clipped nook within the higher proper.
.wrap3 {
  background:url(corner_tr.gif) proper »
  high no-repeat;
  }
Step two: dropping it down#section10
The subsequent step for the CSS is to create the offset that makes the drop shadow drop. This might not be extra easy. All it takes is slightly little bit of padding on the suitable and backside of the innermost div. When the padding causes this div to broaden away from the article inside it, the 2 outer divs broaden with it. The outcome: all three shadow elements, positioned alongside the suitable and backside sides of their divs transfer in tandem, and may now be seen by means of the hole created by the padding.
.wrap3 {
  padding:0 4px 4px 0;
  background:url(corner_tr.gif) proper »
  high no-repeat;
  }
Modifying the offset#section11
Altering the quantity offset in your shadows is nearly as simple as merely altering the padding values on the .wrap3 rule. We are saying “nearly” as a result of adjusting the padding merely strikes the shadow whereas the corners proceed to hug the sides of their containers. To precisely simulate a shift in offset, you’ll have to tweak the background-position of each corners relative to the padding.
Some would say that it’s ok to easily regulate the padding, and depart it at that. No sense complicating issues to realize a nuance that’s barely discernable for most individuals anyway. Others would argue that it cheapens the impact to chop corners this manner. If a way will assist higher aesthetic and technical constancy, as designers we’re obligated to make use of it to its full potential. It’s possible that the majority, nonetheless, may go both method.
Choose for your self.#section12
 This picture is used beneath to exhibit two units of drop shadow kinds. All cases, in each units, draw their
 background-image properties from the identical primary algorithm. In different phrases, the very same shadow graphics are used for each occasion. The one distinction is the diploma of offset.
Within the first set of examples, the offset is modified by adjusting solely the padding values within the .wrap3 rule, which strikes solely the shadow — not the corners. Within the second set, each the padding and background-position values of the corners are modified in order that all the shadow, corners and all, strikes because the offset adjustments.
|
|
|
|
| 8 pixels | 12 pixels | 18 pixels |
|
|
|
|
| 8 pixels | 12 pixels | 18 pixels |
For those who can discern the distinction between the 2 units, and you favor set two, you then’ll want to regulate the background-position of your nook photographs to compensate for the offset in padding. Additional, you’ll want so as to add extra white pixels to the surface edges of your nook photographs. This permits them to maneuver away from the boundary of the div, with out dropping their skill to masks the clipped fringe of the shadow beneath. Every shadow fashion is slightly completely different, and as you start experimenting with offsets, your specific nook white area necessities will grow to be clear.
Step three: making it shrink-to-fit#section13
Just a little sleight of hand was essential to coax each browser that was examined into conformity with this requirement, a possible deal-breaker. However, with out this conduct, each occasion of the shadow fashion would require the foreknowledge of the article’s width in an effort to specify the width of the shadow. Clearly, that wasn’t going to chop it.
A lot of the browsers examined would permit the divs to break down after they obtained the float property. This may have sufficed, if it weren’t for these of you who use IE5 on the Mac. The mere reality that you just exist was purpose sufficient to discover options. Sadly, none had been discovered. Not less than, none that labored universally.
Some analysis and experimentation finally revealed that inline-table, an obscure CSS show property worth, could be the saving grace of this method. Proper, fallacious, or detached, this was all that might be discovered, and it must do. So, utilizing the commentedbackslash technique to isolate Mac IE5, we give it show:inline-table,and all the remainder obtain float. So there it’s, shrink-to-fit — all the pieces, all over the place, in each browser.
The composite outcome:#section14
![]()
With all three steps in place our CSS appears to be like like this:
.wrap1, .wrap2, .wrap3 {
  show:inline-table;
  /* */show:block;/**/
  }
.wrap1 {
  float:left;
  background:url(shadow.gif) proper »
  backside no-repeat;
  }
.wrap2 {
  background:url(corner_bl.gif) left »
  backside no-repeat;
  }
.wrap3 {
  padding:0 4px 4px 0;
  background:url(corner_tr.gif) proper »
  high no-repeat;
  }
Yet another rule, for good measure#section15
As within the above instance, photographs will typically be used with this method. For these events, an extra rule which units a shadowed picture’s show property to block will assist preserve undesirable white area from intruding on a very good factor. Simply add the following rule to your fashion sheet:
.wrap3 img { show:block; }
At this level, it’s possible you’ll wish to browse the drop shadow gallery to get a really feel for what is feasible with this method. We’ve made it simple to obtain quite a lot of shadow supply photographs so you will get began.