Net imagery more and more tends towards losslessness. After we make modifications to a design or graphic, we wish to have the ability to apply them with out damaging the supply materials. That manner, the unique is preserved if we ever have to revert again or make different changes.
Article Continues Beneath
One of many newest capabilities to fall into the arms of net designers is picture processing with mixing modes. Mixing modes enable us to simply create colorization and texturization and apply different particular results with out having to crack open a picture editor. This protects time by not having to manually reprocess graphics every time a change is required, and prevents the headache of getting to recall the precise settings of a visible customary which will have been created months earlier. As an alternative, graphics might be neatly specified, maintained, and manipulated with a number of CSS declarations.
Mixing modes defined#section2
Technically, coloration mixing applies mathematical operations to the colour elements of picture pixels. That’s proper, underlying all this inventive stuff is math! Don’t fear, you don’t have to memorize formulation to make use of mixing modes, nevertheless it’s value at the very least having a cursory understanding of how mixing works beneath the hood.
There are 15 new mixing modes beneficial by the W3C. Info abounds about how the completely different mixing modes work, and there’s nobody proper manner to make use of each. Let’s take a look at only a few of the extra helpful modes in depth. Listed below are three of the commonest methods I take advantage of mixing modes in my workflow:
- Transparency
- Texturing
- Colorization
Transparency impact with multiply#section3
Let’s begin with multiply. This mode’s mathematical components might be damaged down like so:
x = a × b
That’s it. It actually multiplies the colour on the highest layer (a) with the layer under it (b) to get the ensuing coloration (x), therefore the title multiply.
However how do you multiply colours? It really works like this: on pc screens, colours are constructed utilizing crimson, inexperienced, and blue channels. Every of these channels is given a luminance worth—a quantity that dictates how vibrant they’re presupposed to shine. Now that we now have numbers, we will do mathy issues!
After we use the multiply mixing mode, the pc takes the luminance worth of the crimson channel for each layers, converts them to a scale between zero and one, and multiplies them collectively. Then it does the identical for the inexperienced and blue channels. As soon as it has all the totals, it recombines these channels into the ensuing coloration.
That’s all nicely and good, however what’s the sensible impact?
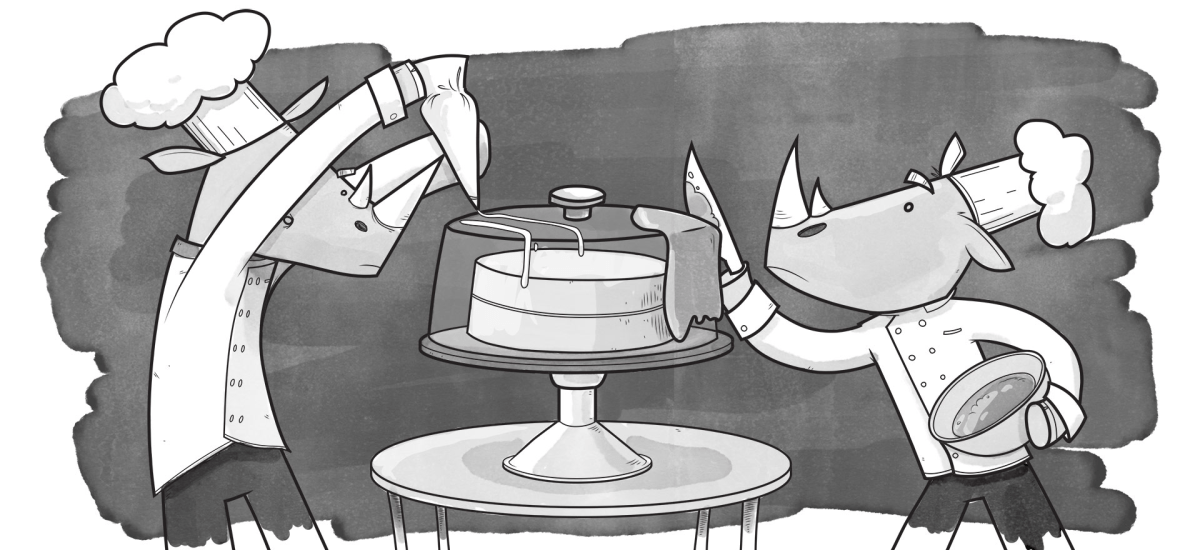
Considered one of my favourite issues to make use of multiply for is to shortcut my manner by way of unhealthy property. Have you ever ever begged for a pleasant sharp vector model of a consumer’s brand, and all you may get your arms on was a JPG, full with the white background of the letterhead it was unexpectedly scanned from? As an alternative of retracing the emblem by hand or working your marching-ants magic, you should utilize multiply. The next instance reveals the way it works.


multiply mix mode utilized.
As soon as multiplied, the black pixels on the highest layer show at their full worth: black. The white pixels, however, don’t present up in any respect. They’re fully clear. The grading shades of grey alongside the sides of the letters will darken the layer under. This gives a pleasant clean edge with minimal processing effort. It’s as if the graphic had a clear background all alongside.
This specific trick solely works in case you’re utilizing black property. If the supply has a coloration, that can colorize the consequence to a point. Nonetheless, in case your asset is white, you should utilize the display mixing mode.
Mud and scratches with display#section4
The useful reverse of multiply known as display. Wait a minute, if it’s the other of multiply, why isn’t it referred to as divide? The reply lies, as soon as once more, within the math:
x = 1 − (1 − a) × (1 − b)
It’s not referred to as “divide” as a result of we’re truly doing extra multiplying! This time we’re multiplying the inverse of a instances the inverse of b after which inverting it as soon as extra. The result’s that now white pixels on the highest layer are fully opaque, whereas black pixels are clear. Each tint in between now lightens the layer under.
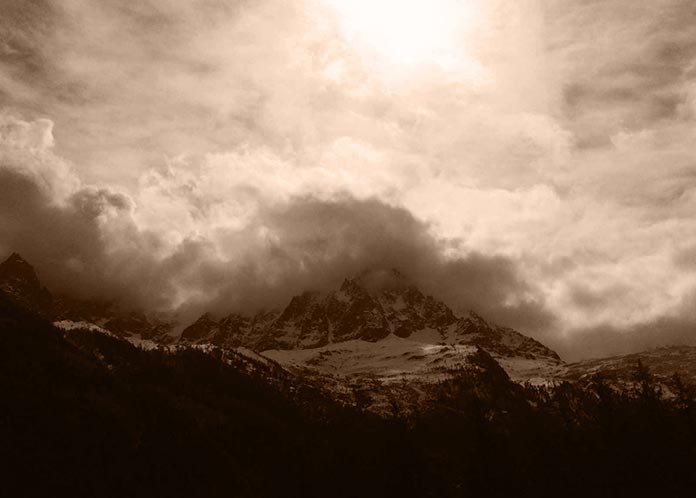
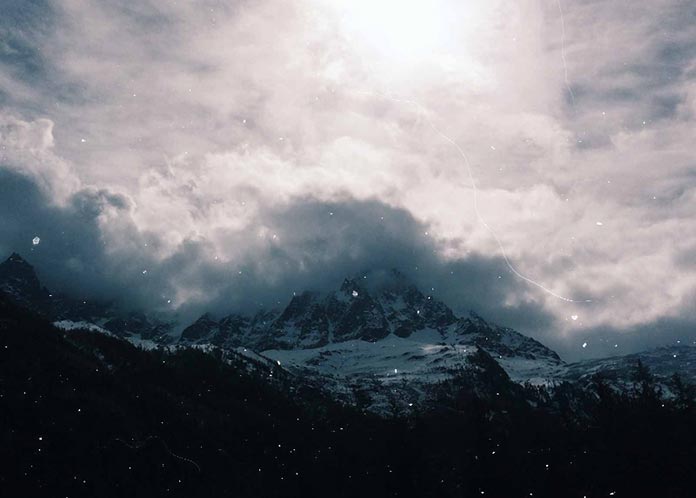
Within the following instance, I wished to provide my picture an aged look, so I took a scan of mud and scratches and blended it with display. I additionally determined to make use of this identical mixing mode to scrub out my picture utilizing a lavender coloration for impact.
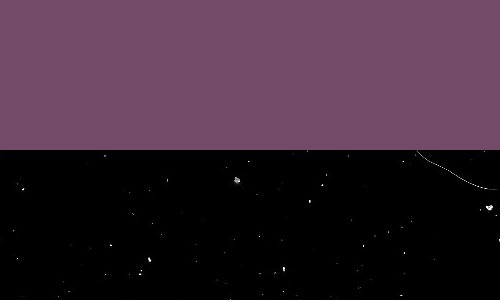

display mixing mode.
By the way, some software program functions do have a divide mode, nevertheless it doesn’t exist within the W3C spec. (I don’t mourn the loss. I’ve by no means had a necessity for it.)
Colorizing with hue and coloration#section5
All mixing modes have the potential to shift the colour of a graphic, however two are notably helpful for colorization: hue, and the aptly named coloration mode.
Hue#section6
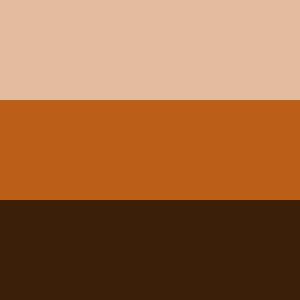
This mixing mode takes the hue element of the overlapping layer and applies it to the colours under, whereas leaving the saturation and luminosity unmodified. I can overlap distinctly completely different colours however nonetheless get the very same consequence, so long as their hue values match. Within the case of the next picture, my three brown hues are all set at 26 levels, however the picture appears to be like the identical regardless of which shade is mixed.

Shade#section7
This mixing mode impacts each the hue and saturation of the supply, whereas ignoring luminosity. A reddish-brown overlay will flip the pixels of the supply reddish-brown, simply as it’ll with the hue mode, however may even make them the identical saturation, which normally creates extra of a placing colorization impact than hue alone.
hue mode, however may even make them the identical saturation.
You’ll be able to obtain the identical impact in case you reverse the order of your layers, placing the colour under the picture, and mixing the picture with the luminosity mixing mode.
Cross-browser mixing#section8
Utilizing these mixing modes, we will now apply Photoshop-level mixing solely with CSS. However regardless that every browser is utilizing the identical math, you might discover that typically the outcomes differ noticeably.

Shade administration is a posh world, and whereas the W3C recommends defaulting to the sRGB coloration profile, assist from distributors is inconsistent. Every browser renders coloration in response to its personal whims. For instance, Chrome renders photos in its default “unmanaged” coloration area until the picture is tagged with a coloration profile. Firefox works the identical, but in addition has a change buried within the configuration settings to activate sRGB for untagged photos. In the meantime, Safari is probably to be a detailed match to Photoshop as a result of Apple’s graphics API is carefully primarily based on Adobe’s PostScript language. Even then there are variations.
Moreover, it’s not simply browsers which might be inconsistent. Persons are inconsistent! Take into account, for instance, the tens of millions who reside with coloration blindness. They doubtless already see your designs in another way than you supposed. As ever, take a look at your creations in related browsers, test your accessibility, and don’t anticipate your designs to look the identical in all places!
Moreover, take a look at on actual units so you possibly can perceive how {hardware} constraints (like low RAM, for instance) will have an effect on your website. Some mixing modes could cause scrolling to lag. When you’re on the lookout for that 60-frames-per-second buttery smoothness, this may occasionally have an effect on your obtainable selections.
Making use of mixing modes#section9
Mixing modes might be utilized with a pair completely different CSS properties: background-blend-mode and mix-blend-mode. A 3rd property, isolation, can come in useful, too.
Mixing background photos#section10
background-blend-mode blends between the layers of a background-image declaration. Because of this as background photos stack on prime of one another, you possibly can apply a mixing mode to combine them collectively.
Let’s do this to place mud and scratches on our picture. (Be aware that solely the related code is proven in these examples.)
<div class="background"></div>
.background {
  background-image: url("dust-and-scratches.jpg"), url("mountain.jpg");
  background-blend-mode: display;
}
You’ll be able to apply a distinct mixing mode for every background-image declaration. Listing them in the identical order as your backgrounds and separate them with commas. The ultimate declaration—the underside layer—is routinely given a standard mixing mode, and this could’t be modified. If you’re utilizing a background-color, that can be your backside layer.
Often, you might wish to make use of coloration overlays. Sadly, CSS’s background-color property limits us to a single coloration, and it’ll all the time be the underside layer, whether or not it’s declared at the start of the record or on the finish. A W3C suggestion proposes an picture() notation that enables an writer to “use a stable coloration as a picture,” however the essential user-agent assist isn’t there but. Fortunately, as a result of gradients are a kind of picture in CSS, we will trick the browser into producing a stable coloration by declaring two matching color-stops!
Now, let’s loosen up the picture like we did earlier than, and alter it to a sepia coloration.
.background {
  background-image:
  linear-gradient(hsl(26, 24%, 42%), hsl(26, 24%, 42%)),  /* sepia */
  linear-gradient(hsl(316, 22%, 37%), hsl(316, 22%, 37%)), /* lavender */
  url("dust-and-scratches.jpg"), url("mountain.jpg");

  background-blend-mode: coloration,   /* sepia */
  display,  /* lavender */
  display;  /* dust-and-scratches */
}

Mixing HTML parts#section11
mix-blend-mode blends between stacked HTML parts, so parts on overlapping layers will mix with these beneath it. Let’s add our title again into the picture and mix away the undesirable white background with multiply. I’ve additionally made it barely clear to provide it a pleasant overprint impact.
<div class="background">
  <div class="text-box">
    <h1>
      <img class="graphic" alt="Chamonix Concord" src="https://alistapart.com/article/blending-modes-demystified/chamonix-harmony.jpg" />
    </h1>
  </div>
</div>
.background {
  background-image:
  linear-gradient(hsl(26, 24%, 42%), hsl(26, 24%, 42%)),  /* sepia */
  linear-gradient(hsl(316, 22%, 37%), hsl(316, 22%, 37%)), /* lavender */
  url("dust-and-scratches.jpg"), url("mountain.jpg");

  background-blend-mode: coloration,  /* sepia */
  display, /* lavender */
  display;  /* mud and scratches */
}

.graphic {
  mix-blend-mode: multiply;
  opacity: 70%;  /* overprint impact */
}

Right here’s a brand new instance utilizing mix-blend-mode to mix a number of parts.
<div class="background">
  <div class="red-disc">
    <img alt="" src="https://alistapart.com/article/blending-modes-demystified/red-disc.svg" />
  </div>
  <div class="green-disc">
    <img alt="" src="green-disc.svg" />
  </div>
  <div class="blue-disc">
    <img alt="" src="blue-disc.svg" />
  </div>
</div>
.red-disc, .green-disc, .blue-disc {
  mix-blend-mode: display;
}
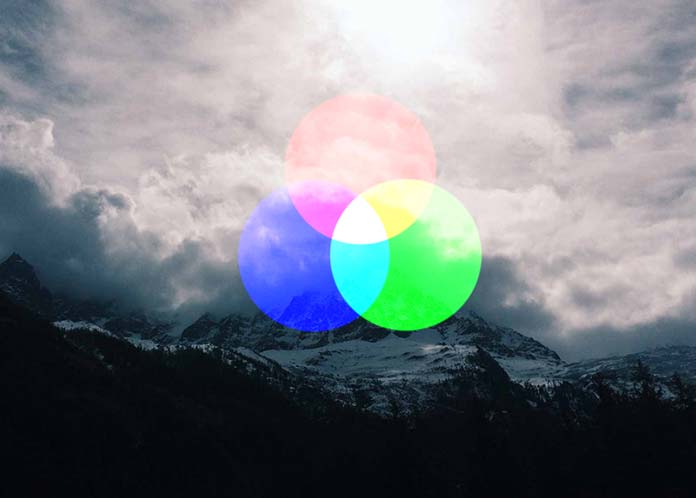
mix-blend-mode to mix a number of parts.
When you don’t need a component on a decrease layer to be blended with a specific layer above it, you possibly can separate it utilizing a 3rd property: isolation. That is helpful for mixing a number of parts collectively with out affecting the bottom layer. Every of those discs has their mix-blend-mode property set to display, which causes them to create new colours the place they overlap. Nonetheless, we wish to isolate the mountain picture in order that it isn’t blended together with the colours.
.background {
  isolation: isolate;
}

isolation property to stop a component on a decrease layer from being blended with the layers above it.
Remember the fact that mix-blend-mode is utilized to a complete ingredient together with all of its kids. In the identical manner that opacity had the aspect impact of constructing the contents of containers clear, we additionally see this occurring with mix-blend-mode. The contents and the container are blended collectively.
Within the following instance, I’ve gone into Photoshop and mocked up a promotion for a fictitious ski tools producer I’m calling Masstif. In it, I’ve created a field to function some copy and a brand. I’m mixing the field utilizing the colour dodge mode. This offers a robust distinction to the background and permits the textual content and graphic to face out higher.
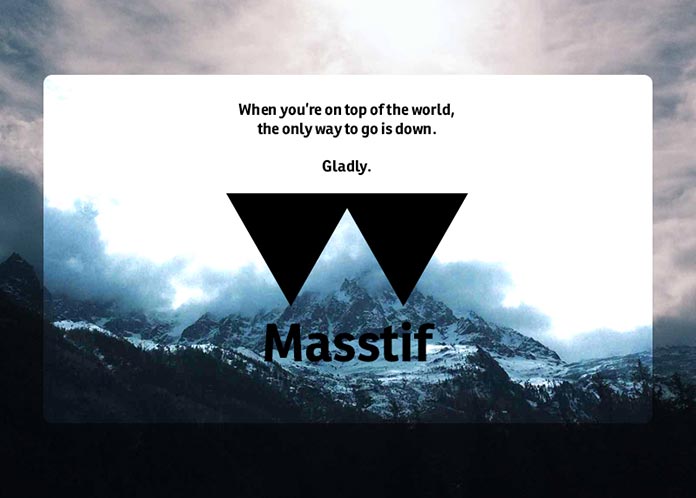
After I construct this with HTML and CSS, I would anticipate it to work like this:
<div class="background">
  <div class="ad-contents">
    <p>If you’re on prime of the world,<br/>
    the one option to go is down.</p>
    <p>Gladly.</p>
    <img alt="Masstif" src="https://alistapart.com/article/blending-modes-demystified/brand.svg" />
  </div>
</div>
.background {
  background-image: url("mountain.jpg");
}
.ad-contents {
  background-color: white;
  mix-blend-mode: color-dodge;
}
However the precise result’s that all the contents are blended together with the container, as the next picture reveals.
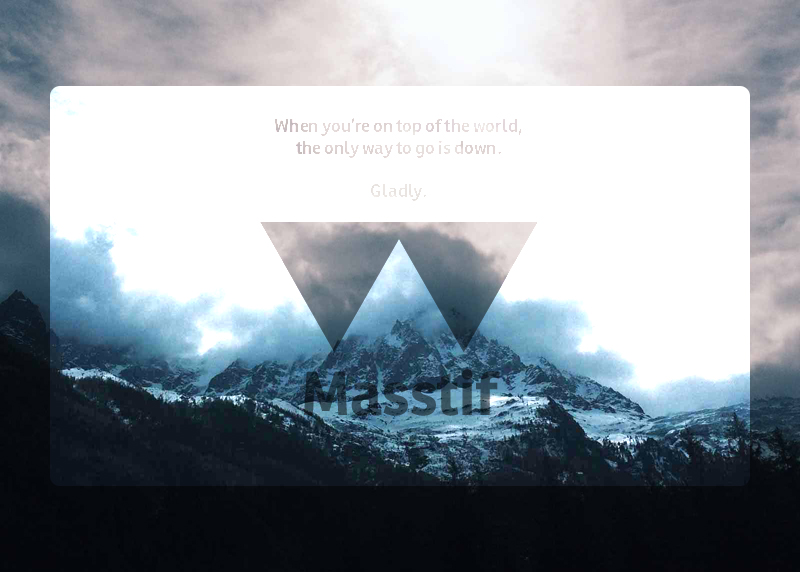
Simply because the opacity concern might be addressed to a point by profiting from background alpha channels, right here too we will sort out this drawback with mix-blend-mode by shifting what we will into the background. As an alternative of making a field and mixing with mix-blend-mode, it’d work by changing the field to a background-image. This gained’t remedy each drawback, nevertheless it’s value making an attempt. Apart from that, there’s no option to isolate little one nodes from a blended ingredient.
Mixing modes are supported in most main browsers, besides Web Explorer and Edge. The silver lining is that Microsoft lists the properties as “into consideration” for Edge, and that browser does already assist all of those mix modes in SVG, so one can hope for a speedy implementation. Votes for these properties on the Microsoft Edge Developer Uservoice discussion board would assist, too.
Additionally, be aware that Safari 9 doesn’t assist the hue, saturation, luminosity, and coloration mixing modes.
Remember the fact that browsers that don’t assist mixing modes gained’t render your designs precisely as you supposed. Until you recognize for positive that your viewers is working sufficiently superior browser expertise, this could make issues tough. Ask your self if fallbacks are acceptable for a portion of your viewers. If not, you’ll have to discover a workaround.
Regardless of these caveats, mixing modes are a welcome addition to any designer’s device belt. We will now add transparency, wealthy coloration, and texture processing to our designs with CSS—and we will achieve this losslessly and flexibly. That’s extra energy obtainable straight within the browser and at our fingertips.