
I’m sorry. Actually. I didn’t title it. I don’t imply to overstate its significance or trivialize the opposite and slightly weightier Holy Grails.
Article Continues Under
However the title’s on the market, and everyone knows what it means.
Three columns. One fixed-width sidebar to your navigation, one other for, say, your Google Advertisements or your Flickr pictures—and, as in a elaborate truffle, a liquid middle for the true substance. Its extensive applicability on this golden age of running a blog, together with its appreciable problem, is what has earned the structure the title of Holy Grail.
Many articles have been written concerning the grail, and a number of other good templates exist. Nonetheless, all the present options contain sacrifices: correct supply order, full-width footers, and lean markup are sometimes compromised within the pursuit of this elusive structure.
A latest challenge has introduced my private grail quest to an finish. The approach I’ll describe will help you deploy the Holy Grail structure with out compromising your code or your flexibility. It’ll:
- have a fluid middle with fastened width sidebars,
- permit the middle column to look first within the supply,
- permit any column to be the tallest,
- require solely a single further
divof markup, and - require quite simple CSS, with minimal
hackspatches.
On the shoulders of giants#section2
The approach introduced right here is impressed by Alex Robinson’s sensible One True Format. Alex even addressed the Holy Grail downside in his article, however his resolution requires two wrappers and makes padding troublesome with out a additional layer of divs inside every column.
One other lead got here from Eric Meyer’s adaptation that makes use of positioning to combine a number of unit varieties. His instance additionally yields a three-column structure with fastened sidebars and a liquid middle. Sadly, it depends on approximate percentages and fills a portion of the viewport that varies extensively with totally different display screen resolutions.
Sufficient discuss—let’s see some code#section3
The required HTML is intuitive and chic.
(For the sake of readability in demonstrating this method, we’re deliberately utilizing the non-semantic ids “middle,” “left,” and “proper.” We advocate you employ semantic ids in any utility of this method. —Ed.)
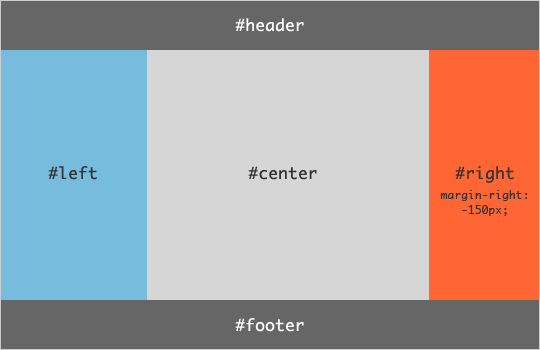
<div id="header"></div><div id="container">
  <div id="middle" class="column"></div>
  <div id="left" class="column"></div>
  <div id="proper" class="column"></div></div><div id="footer"></div>
That’s it. A single further div to comprise the columns is all that you just want; this satisfies even my obsessive compulsive markup habits.
The stylesheet is sort of as easy. Let’s say you need to have a left column with a set width of 200 pixels and a proper column with a set width of 150 pixels. To simplify the feedback, I’ll abbreviate the left, proper, and middle columns as LC, RC, and CC, respectively. The important CSS is right here:
physique {
  min-width: 550px;      /* 2x LC width + RC width */
}
#container {
  padding-left: 200px;   /* LC width */
  padding-right: 150px;  /* RC width */
}
#container .column {
  place: relative;
  float: left;
}
#middle {
  width: 100%;
}
#left {
  width: 200px;          /* LC width */
  proper: 200px;          /* LC width */
  margin-left: -100%;
}
#proper {
  width: 150px;          /* RC width */
  margin-right: -150px;  /* RC width */
}
#footer {
  clear: each;
}
/*** IE6 Repair ***/
* html #left {
  left: 150px;           /* RC width */
}
Merely substitute the values together with your desired dimensions and the grail is yours. The approach works in all fashionable browsers: Safari, Opera, Firefox, and (with the single-rule hack on the backside) IE6. IE5.5 assist would require at the very least a box-model hack, which is left as an train to the reader.
Have a look and marvel on the class.
The technique is easy. The container div could have a liquid middle and fixed-width padding on the aspect. The trick is then to get the left column to line up with the left padding and the fitting column with the fitting padding, leaving the middle column to fill the liquid width of the container.
Let’s construct this up step-by-step.
Step 1: Create the body#section5
Begin with the header, footer, and container.
<div id="header"></div><div id="container"></div><div id="footer"></div>
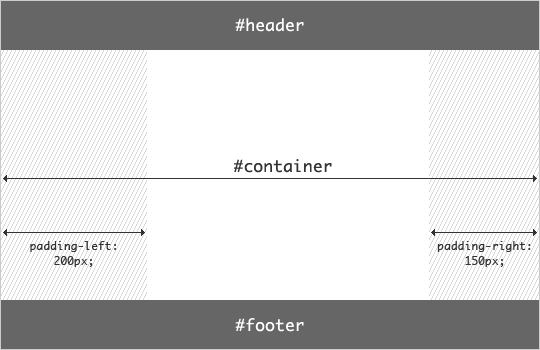
We pad the container with the width we wish our left and proper columns to occupy.
#container {
  padding-left: 200px;   /* LC width */
  padding-right: 150px;  /* RC width */
}
Our structure now seems like this:
Step 1: Create the body
Step 2: Add the columns#section6
Now that we’ve got our fundamental body, we’ll stick within the columns.
<div id="header"></div><div id="container">
  <div id="middle" class="column"></div>
  <div id="left" class="column"></div>
  <div id="proper" class="column"></div>
</div><div id="footer"></div>
Subsequent we add the suitable widths and float them to get them in line. We’ll additionally have to clear the footer to maintain it beneath the floated columns.
#container .column {
  float: left;
}
#middle {
  width: 100%;
}
#left {
  width: 200px;  /* LC width */
}
#proper {
  width: 150px;  /* RC width */
}
#footer {
  clear: each;
}
Notice that the 100% width on the middle column refers back to the width of the container div, unique of the padding. We’ll see this 100% width once more because the structure comes collectively, and it’ll nonetheless check with this central width of the container.
The columns now need to line up so as, however as a result of the middle column is taking on 100% of the accessible area, the left and proper columns wrap.
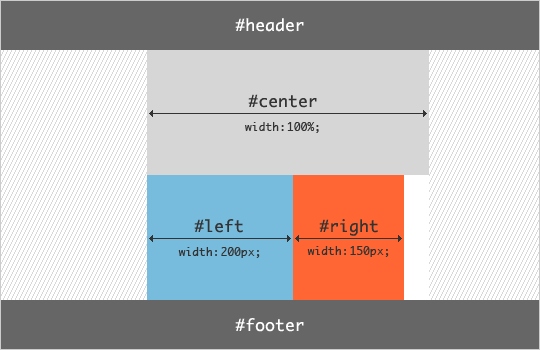
Step 2: Add the columns
Step 3: Pull the left column into place#section7
The one factor left is to get the colums to line up with the padding on the container. The middle column begins precisely the place it must be, so we’ll deal with the left column.
It takes two steps to get the left column in place. First, we’ll pull all of it the way in which throughout the middle column with a 100% damaging margin. Do not forget that the 100% refers back to the central width of the container, which can also be precisely the width of the middle column.
#left {
  width: 200px;        /* LC width */
  margin-left: -100%;
}
Now the left column is overlapping the middle column, sharing its left edge. The suitable column floats left and nestles towards proper fringe of the middle column (however nonetheless wraps), leaving us with the next:
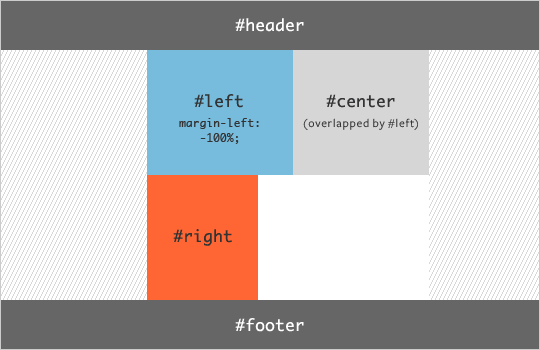
Step 3: Pull the left column into place—midway there
To push the left column the remainder of the way in which over, we’ll use relative positioning with an offset that’s precisely the width of the left column.
#container .columns {
  float: left;
  place: relative;
}
#left {
  width: 200px;        /* LC width */
  margin-left: -100%;
  proper: 200px;        /* LC width */
}
The proper property pushes it 200px away from the fitting edge; that’s, to the left. Now the left column strains up completely with the left padding of the container.
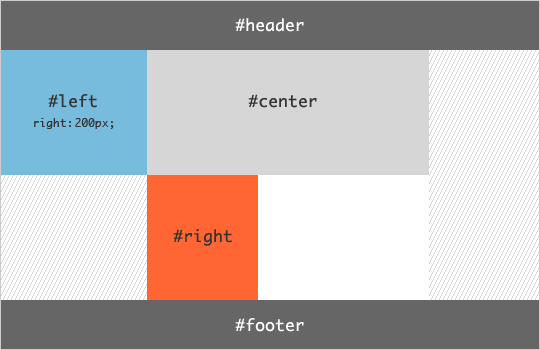
Step 3: Left column pulled into place
Step 4: Pull the fitting column into place#section8
The one activity remaining is to drag the fitting column into place. To try this, we simply want to drag it out of the container and into the container’s padding. We’ll once more use a damaging margin.
#proper {
  width: 150px;          /* RC width */
  margin-right: -150px;  /* RC width */
}
The whole lot is now in its proper place, and the wrapping disappears.
Step 4: Pull the fitting column into place
Step 5: Design defensively#section9
If the browser window is resized in order that the middle turns into smaller than the left column, the structure breaks in a standards-compliant browser. Setting a min-width on the physique retains your columns in place. With IE6 this doesn’t occur, so the truth that it doesn’t assist min-width isn’t an issue.
physique {
  min-width: 550px;  /* 2x LC width + RC width */
}
In fact, no structure approach could be full with out requiring some type of workaround in Web Explorer. The damaging margin pulls the left column too far to the left in IE6 (the complete width of the browser window). We have to push it again to the fitting the complete width of the fitting column—utilizing the star-html hack to masks it from different browsers—and we’re able to go.
* html #left {
  left: 150px;  /* RC width */
}
The explanation we have to use the width of the proper column includes a little bit of algebra. I received’t bore you with the main points; you’ll be able to work it out for your self or simply think about it one other one among IE’s many charms.
I’m no designer, however wanting on the structure above offends even my aesthetic sensibilities. The unpadded columns are onerous on the eyes and troublesome to learn. We want whitespace.
One of many drawbacks of utilizing percentages with the One True Format to create liquid columns that it makes padding the columns a bit tough. Share paddings are inclined to look unhealthy at some display screen widths. Fastened paddings may be added, however solely by cluttering the markup with a div nested inside every column.
With this method, padding isn’t an issue. Padding may be added on to the left and proper columns; simply regulate the width accordingly. To offer a 10-pixel padding to the left column within the instance above, however maintain it’s full width (padding + width) at 200px, merely change the rule as follows:
#left {
  width: 180px;        /* LC fullwidth - padding */
  padding: 0 10px;
  proper: 200px;        /* LC fullwidth */
  margin-left: -100%;
}
Padding the middle requires somewhat extra ingenuity, however no extra markup and solely a pinch of extra CSS.
The padding plus a width of 100% causes the middle column to increase past the non-padded width of the container. With a view to tame it again into place, we have to enhance the fitting margin by the entire quantity of the padding. This ensures that the middle column is simply as massive as we anticipate it to be.
Additionally, for the reason that middle column is now wider, the left column has a bigger distance to maneuver with a view to get to the right place. Rising the offset by the entire middle padding does the trick.
To make this concrete, I’ll modify the instance so as to add a 10-pixel padding to every aspect column (for a complete of 20 pixels), and a 20-pixel padding to every aspect of the middle (for a complete of 40 pixels). The brand new CSS seems like this:
physique {
  min-width: 630px;      /* 2x (LC fullwidth +
                            CC padding) + RC fullwidth */
}
#container {
  padding-left: 200px;   /* LC fullwidth */
  padding-right: 190px;  /* RC fullwidth + CC padding */
}
#container .column {
  place: relative;
  float: left;
}
#middle {
  padding: 10px 20px;    /* CC padding */
  width: 100%;
}
#left {
  width: 180px;          /* LC width */
  padding: 0 10px;       /* LC padding */
  proper: 240px;          /* LC fullwidth + CC padding */
  margin-left: -100%;
}
#proper {
  width: 130px;          /* RC width */
  padding: 0 10px;       /* RC padding */
  margin-right: -190px;  /* RC fullwidth + CC padding */
}
#footer {
  clear: each;
}/*** IE Repair ***/
* html #left {
  left: 150px;           /* RC fullwidth */
}
In fact, high and backside padding may be added with none issues. See this properly padded model for the complete template.
This method works simply as nicely for ems. Sadly, you’ll be able to’t mix-and-match ems and pixels, so select, however select properly.
This method actually comes collectively when the columns are given equal heights. The strategy I’m utilizing is tailored wholesale from the One True Format, so I received’t go over it intimately. To deploy it, merely add the next CSS:
#container {
  overflow: hidden;
}
#container .column {
  padding-bottom: 20010px;  /* X + padding-bottom */
  margin-bottom: -20000px;  /* X */
}
#footer {
  place: relative;
}
Right here, I’ve given the columns an additional padding of 10px on the underside.
The same old caveats apply. Bear in mind that Opera 8 has a bug with overflow: hidden that leaves your whole columns large. A workaround is detailed on the One True Format web page; you should utilize that, or look ahead to Opera 9 (which fixes the bug) to return out of beta.
One extra downside distinctive to this structure is that IE doesn’t clip the column backgrounds on the backside of the container. They spill out over the footer if the web page shouldn’t be as tall because the viewport. This isn’t an issue if you happen to don’t have a separate footer, or in case your pages are tall sufficient to make sure that you’ll all the time take up the entire viewport.
In the event you want that footer, although, by no means worry. This, too, is fixable, however requires yet one more div. Add a wrapper to the footer, like so:
<div id="footer-wrapper">
  <div id="footer"></div>
</div>
Now re-use the identical trick with the equal columns to make the footer wrapper prolong past the web page, leaving the footer itself so that you can do with as you please.
* html physique {
  overflow: hidden;
}
* html #footer-wrapper {
  float: left;
  place: relative;
  width: 100%;
  padding-bottom: 10010px;
  margin-bottom: -10000px;
  background: #fff;         /* Similar as physique
                               background */
}
This solves the issue, and leaves us with the specified outcome and a minimal of cruft.
Oh, and there’s yet one more factor#section12
The extremists on the market is perhaps questioning to themselves whether or not there’s not a good higher manner to do that. In spite of everything, the strategy I’ve illustrated introduces a non-semantic container div. Certainly we are able to’t have one further div cluttering up our in any other case flawless markup.
In the event you, like me, have been questioning this very factor, surprise no extra. As a particular bonus, I current to you the wrapper-free Holy Grail, in all its minimalist glory. One div for every part of the code—no extra, no much less. Semantic bliss, virtually worthy of the title of “Holy Grail.”
The precept behind the CSS is identical. The padding has been utilized on to the physique, eliminating the necessity for any containers. Damaging margins stretch the header and footer to make sure that they take up your entire area.
This tiny model works in all of the aforementioned browsers, even (virtually shockingly) Web Explorer. Equal-height columns do not work, nonetheless, and this structure will break down for very small window widths. Use it with warning.
Whereas this specific utility of the Holy Grail is slightly particular, the approach may be generalized significantly. Why not have two liquid columns? Why not swap up the column orders? These functions are past the scope of this text, however achievable with minor modifications. Use the grail properly, and it may be a very useful (and clutter-free) addition to your bag of CSS tips.