Issues are wanting good to date: we’ve bought a grid-based format, one which doesn’t sacrifice complexity for flexibility. I’ve to confess that the primary time I discovered the right way to construct a fluid grid, I used to be feeling fairly pleased with myself.
Article Continues Under
However then, as usually occurs with net design, despair set in. At the moment, our web page is awash in phrases, and little else. Truly, nothing else: our web page is nothing however textual content. Why is that this an issue? Nicely, textual content reflows effortlessly inside a versatile container—and I don’t know in case you’ve observed, however the Web appears to have one or two of these “picture” issues mendacity round. None of which we’ve integrated into our fluid grid.
So what occurs once we introduce fixed-width pictures into our versatile design?
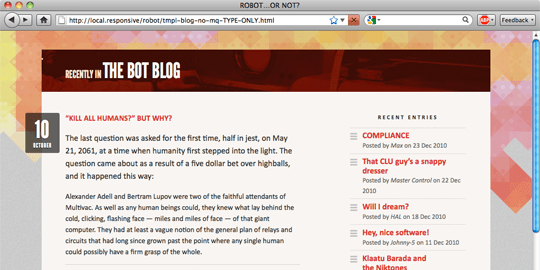
Fig 3.0: Our versatile grid is lastly completed. not a pixel worth in sight, and we didn’t have to scrimp on the aesthetics.
Going again, again to markup, markup#section2
To search out a solution, let’s do a fast experiment: let’s drop a picture straight into our weblog module, and see how our format responds. The very first thing we’ll have to do is to clear some house for it in our markup.
Keep in mind our little blockquote, comfortably tucked into our weblog article? Nicely, we’ve bought manner an excessive amount of textual content on this darned web page, so let’s exchange it with an inset picture:
<div class="determine">
  <p>
    <img src="https://alistapart.com/article/fluid-images/robotic.jpg" alt="" />
    <b class="figcaption">Lo, the robotic walks</b>
  </p>
</div>
Nothing fancy: an img aspect, adopted by a quick however descriptive caption wrapped in a b aspect. I’m truly appropriating the HTML5 determine/figcaption tags as class names on this snippet, which makes for a solidly semantic basis.
(Sharp-eyed readers will notice that I’m utilizing a b aspect for a non-semantic hook. Now, some designers may use a span aspect as a substitute. Me, I just like the terseness of shorter tags like b or i for non-semantic markup.)
With that HTML completed, let’s drop in some fundamental CSS:
.determine {
  float: proper;
  margin-bottom: 0.5em;
  margin-left: 2.53164557%;  /* 12px / 474px */
  width: 48.7341772%;  /* 231px / 474px */
}
We’re creating a pleasant inset impact for our determine. It’ll be floated to the suitable, and can span roughly half the width of our article, or 4 columns of our versatile grid. Markup: examine; fashion: examine. After all, all this HTML and CSS is for naught if there isn’t an precise picture out there.
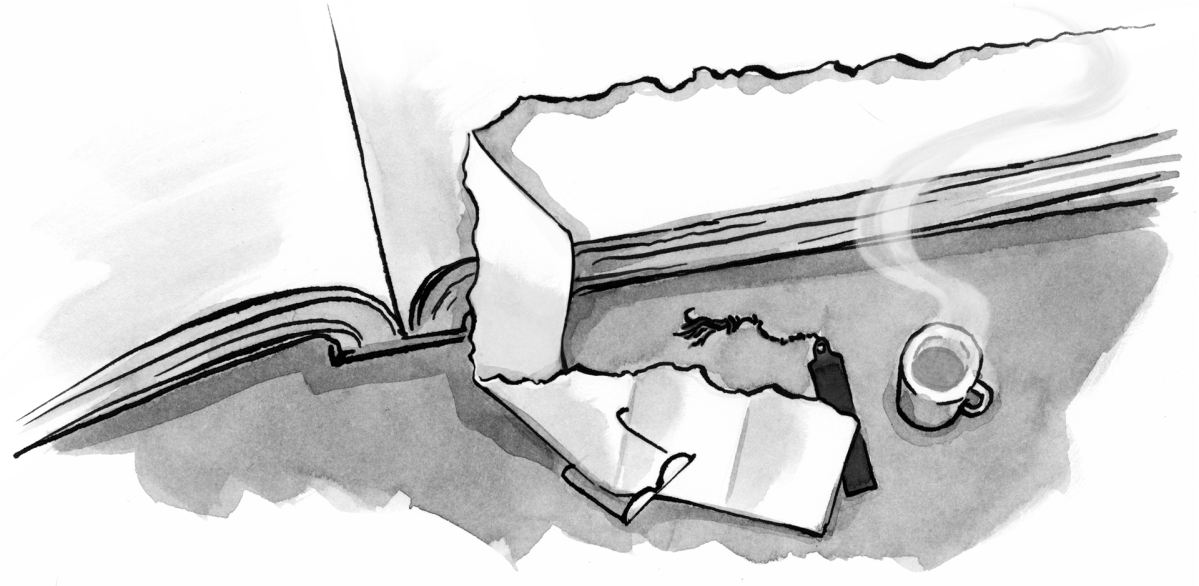
Now, as a result of I like you (and robots) dearly, not simply any picture will do. And after scouring the online for complete minutes, I discovered a fantastically imposing robo-portrait (fig 3.1). The gorgeous factor about this picture (apart from the robotic, after all) is that it’s enormous. I’ve cropped it barely, however I haven’t scaled it down in any respect, leaving it at its native decision of 655—655. This picture is far bigger than we all know its versatile container can be, making it an ideal case to check how strong our versatile format is.
So let’s drop our outsized picture onto the server, reload the web page, and—oh. Nicely. That’s just about the worst factor on the web.
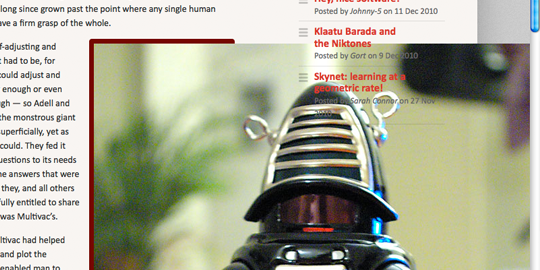
Fig 3.2: Our enormous picture is large. Our damaged format is damaged.
Truly, the consequence isn’t that shocking. Our format isn’t damaged per se—our versatile container is working simply advantageous, and the proportions of our grid’s columns stay intact. However as a result of our picture is far wider than its containing .determine, the surplus content material merely overflows its container, and is seen to the consumer. There merely aren’t any constraints utilized to our picture that would make it conscious of its versatile surroundings.
However what if we may introduce such a constraint? What if we may write a rule that stops pictures from exceeding the width of their container?
Nicely, right here’s the excellent news: that’s very simple to do:
img {
  max-width: 100%;
}
First found by designer Richard Rutter, this one rule instantly supplies an extremely useful constraint for each picture in our doc. Now, our img aspect will render at no matter dimension it needs, so long as it’s narrower than its containing aspect. But when it occurs to be wider than its container, then the max-width: 100% directive forces the picture’s width to match the width of its container. And as you’ll be able to see, our picture has snapped into place.
Fig 3.3: Simply by together with max-width: 100%, we’ve prevented our picture from escaping its versatile container. On a associated notice, I like max-width: 100%.
What’s extra, fashionable browsers have developed to the purpose the place they resize the photographs proportionally: as our versatile container resizes itself, shrinking or enlarging our picture, the picture’s facet ratio stays intact.
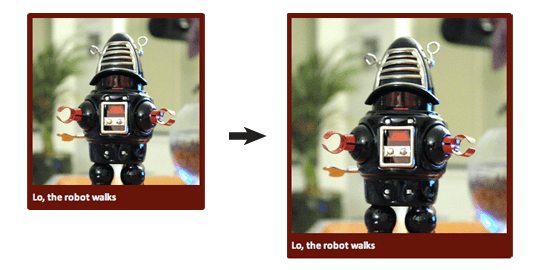
Fig 3.4: No matter how huge or small its versatile container turns into, the picture resizes proportionally. Magic? Who can say.
I hope you’re not uninterested in all this excellent news as a result of because it occurs, the max-width: 100% rule may apply to most fixed-width parts, like video and different wealthy media. In actual fact, we are able to beef up our selector to cowl different media-ready parts, like so:
img,
embed,
object,
video {
  max-width: 100%;
}
Whether or not it’s a cute little Flash video, another embedded media, or a humble img, browsers do a good job of resizing the content material proportionally in a versatile format. All because of our light-weight max-width constraint.
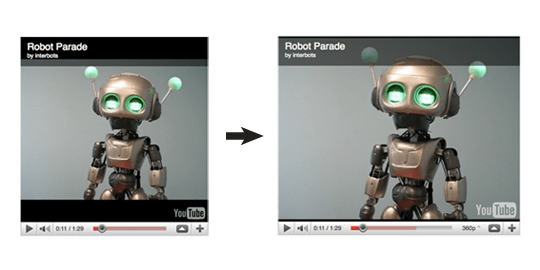
Fig 3.5: Different media play properly with max-width: 100%, changing into versatile themselves. Did I point out I like max-width: 100%?
So we’ve cracked the issue of versatile pictures and media—proper? One CSS rule and we’re executed?
As a result of this job is rarely simple#section4
Time to let the therapeutic start: we have to work by way of the ache, the tears, the rending of clothes, and speak about a couple of browser-specific points round versatile pictures.
max-width in Web Explorer#section5
The chilly, exhausting reality is that Web Explorer 6 and beneath don’t help the max-width property. IE7 model and above? Oh, it’s positively brimming with help for max-width. However in case you’re caught supporting the (cough) venerable IE6 or decrease, our strategy wants refinement.
Now, there are a number of documented methods to get max-width help working in IE6. Most are JavaScript-driven, often counting on Microsoft’s proprietary expression filter to dynamically consider the width of a component, and to manually resize it if it exceeds a sure threshold. For an instance of those decidedly non-standard workarounds, I’d advocate Svend Tofte’s basic weblog entry on the topic.
Me? I are inclined to favor a extra lo-fi, CSS-driven strategy. Specifically, all fashionable browsers get our max-width constraint:
img,
embed,
object,
video {
  max-width: 100%;
}
However in a separate IE6-specific stylesheet, I’ll embody the next:
img,
embed,
object,
video {
 width: 100%;
}
See the distinction? IE6 and decrease get width: 100%, moderately than the max-width: 100% rule.
A phrase of warning: tread rigorously right here, for these are drastically totally different guidelines. Whereas max-width: 100% instructs our pictures to by no means exceed the width of their containers, width: 100% forces our pictures to at all times match the width of their containing parts.
More often than not, this strategy will work simply advantageous. For instance, it’s protected to imagine that our outsized robotic.jpg picture will at all times be bigger than its containing aspect, so the width: 100% rule works superbly.
However for smaller pictures like thumbnails, or most embedded motion pictures, it won’t be acceptable to blindly up-scale them with CSS. If that’s the case, then a bit extra specificity could be warranted for IE:
img.full,
object.full,
.major img,
.major object {
  width: 100%;
}
When you don’t need the width: 100% rule to use to each piece of fixed-width media in your web page, we are able to merely write an inventory of selectors that focus on sure sorts of pictures or video (img.full), or sure areas of your doc the place you already know you’ll be coping with outsized media (.major img, .major object). Consider this like a whitelist: if pictures or different media seem on this checklist, then they’ll be versatile; in any other case, they’ll be mounted of their stodgy previous pixel-y methods.
So in case you’re nonetheless supporting legacy variations of Web Explorer, a rigorously utilized width: 100% rule can get these versatile pictures working superbly. However with that bug sorted, we’ve nonetheless bought one to go.
And boy, it’s a doozy.
Through which it turns into clear that Home windows hates us#section6

Fig 3.6: Seen right here in IE6, our robotic picture has developed some ugly artifacts. Guess Home windows doesn’t a lot take care of our versatile pictures.
When you have a look at our weblog module with sure Home windows-based browsers, our robotic.jpg has gone from wanting imposing to wanting, effectively, damaged). However this isn’t a browser-specific problem as a lot as a platform-specific one: Home windows doesn’t scale pictures that effectively. In actual fact, once they’re resized through CSS, pictures shortly develop artifacts on Home windows, dramatically impacting their high quality. And never in a great way.
For a fast check case, I’ve tossed a text-heavy graphic into a versatile container, after which resized our picture with the max-width: 100% repair, whereas IE6 and beneath obtain the width: 100% workaround. Now, you’d by no means truly put this quantity of textual content in a picture. Nevertheless it completely illustrates simply how badly issues can get in IE7 or decrease. As you’ll be able to see, the picture appears—in case you’ll pardon the technical time period—downright nasty.
However earlier than you hand over on the promise of scaleable, versatile pictures, it’s value noting that this bug doesn’t have an effect on each Home windows-based browser. In actual fact, solely Web Explorer 7 and decrease are affected, as is Firefox 2 and decrease on Home windows. Extra fashionable browsers like Safari, Firefox 3+, and IE8+ don’t exhibit a single downside with versatile pictures. What’s extra, the bug appears to have been mounted in Home windows 7, in order that’s extra excellent news.
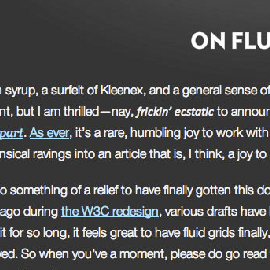
Fig 3.7: In sure Home windows-based browsers, the picture shortly develops too many artifacts to be readable.
So with the scope of the issue outlined, absolutely there’s a patch we are able to apply? Fortunately, there may be—except for Firefox 2.
Now, this grizzled previous browser was launched in 2006, so I feel it’s protected to imagine it isn’t precisely clogging up your web site’s site visitors logs. At any charge, a patch for Firefox 2 would require some pretty concerned browser-sniffing to focus on particular variations on a selected platform—and browser-sniffing is unreliable at greatest. However even when we did need to carry out that sort of detection, these older variations of Firefox don’t have a change that would repair our busted-looking pictures.
Web Explorer, nonetheless, does have such a toggle. (Pardon me while I swallow my satisfaction for this subsequent part title.)
Hail AlphaImageLoader, the conquering hero#section7
Ever tried to get clear PNGs working in IE6 and beneath? Likelihood is good you’ve encountered AlphaImageLoader, one among Microsoft’s proprietary CSS filters. There have since been extra strong patches created for IE’s lack of help for the PNG alpha channel (Drew Diller’s DD_belatedPNG library is a present favourite of mine), however traditionally, in case you had a PNG hooked up to a component’s background, you might drop the next rule into an IE-specific stylesheet: (Line wraps marked » —Ed.)
.brand {
  background: none;
  filter: progid:DXImageTransform.Microsoft.AlphaImageLoader»
  (src="https://alistapart.com/path/to/brand.png", sizingMethod="scale");
}
This AlphaImageLoader patch does a couple of issues. First, it removes the background picture from the aspect, then inserts it into an AlphaImageLoader object that sits “between” the correct background layer and the aspect’s content material. However the sizingMethod property is the intelligent bit, dictating whether or not the AlphaImageLoader object ought to crop any elements of the picture that overflow its container, deal with it like a daily picture, or scale it to suit it inside its containing aspect.
I can hear you stifling your yawns by now: in any case, what does an IE-specific PNG repair must do with our damaged picture rendering?
Fairly a bit, because it seems. At one level I found that making use of AlphaImageLoader to a picture dramatically improves its rendering high quality in IE, bringing it as much as par with, effectively, each different browser on the planet. Moreover, by setting the sizingMethod property to scale, we are able to use our AlphaImageLoader object to create the phantasm of a versatile picture.
So I whipped up some JavaScript to automate that course of. Merely obtain the script and embody it on any web page with versatile pictures; it’ll scour your doc to create a collection of versatile, high-quality AlphaImageLoader objects.
And with that repair utilized, the distinction in our rendered pictures is noticeable: in our instance we’ve gone from an impossibly distorted picture to an immaculately rendered one. And it really works splendidly in a versatile context.
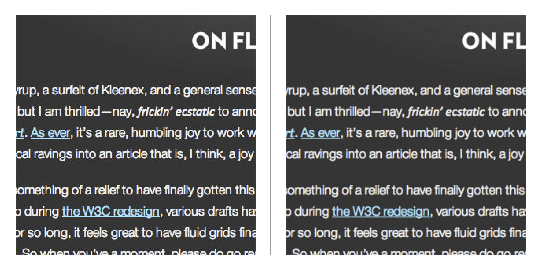
Fig 3.8: Our picture is now completely legible, and resizing splendidly. A dab of AlphaImageLoader’ll do ya.
(It’s value mentioning that lots of Microsoft’s proprietary filters, and AlphaImageLoader specifically, have some efficiency overhead related to them, Stoyan Stefanov covers the pitfalls in additional element on the YUI weblog. What does this imply for you? Simply you should definitely check the repair completely in your web site, gauge its impact in your customers, and consider whether or not or not the improved rendering is definitely worth the efficiency tradeoff.)
With the max-width: 100% repair in place (and aided by our width: 100% and AlphaImageLoader patches), our inset picture is resizing superbly throughout our goal browsers. Irrespective of the scale of the browser window, our picture scales harmoniously together with the proportions of our versatile grid.
However what about pictures that aren’t truly in our markup?
Flexibly tiled background pictures#section8
Let’s say our dearly esteemed designer sends over a revised mockup of our weblog module. Discover something totally different about it?
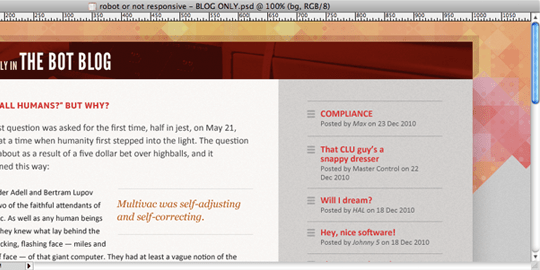
Fig 3.9: Our weblog’s sidebar is now sporting a background graphic. Nóng.
Up till now, our weblog’s content material has been sitting on a moderately unassuming near-white background. However now the design has been modified barely, including a two-toned background to the weblog entry to supply extra distinction between the left- and right-hand columns. What’s extra, there’s truly a refined degree of noise added to the background, including an additional degree of texture to our design:
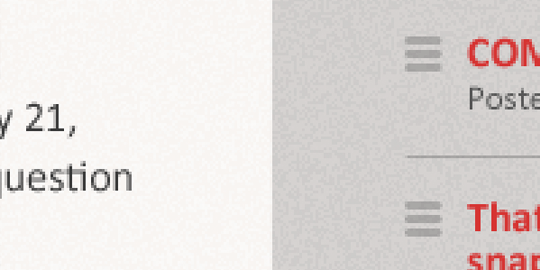
Fig 3.10: An in depth have a look at our new background therapy.
So: how can we truly add this new background picture to our template?
Again in 2004, Dan Cederholm wrote a superb article exhibiting how a vertically repeating background graphic could possibly be used to create a “fake column” impact. The method’s genius is in its simplicity: by tiling a coloured background graphic vertically behind our content material, we are able to create the phantasm of equal top columns.
In Dan’s unique method, the background graphic was merely centered on the high of the content material space after which tiled vertically, like so:
.weblog {
  background: #F8F5F2 url("blog-bg.png") repeat-y 50% 0;
}
And that method works superbly. However Dan’s method assumes that your design is a hard and fast width, making a graphic that matches the width of your design. Then how, pray, are we speculated to work in a background picture that tiles over two versatile columns?
Because of some early analysis by designer Doug Bowman, we are able to nonetheless apply the fake column method. It simply requires somewhat bit of additional planning, in addition to a splash of your favourite formulation, goal ÷ context = consequence.
First, we’ll start by having a look at our mockup, to search out the transition level in our background graphic, the precise pixel at which our white column transitions into the grey. And from the look of issues, that change occurs on the 568 pixel mark.

Fig 3.11: Our white column switches over to grey on the 568px mark. That’s our transition level.
Armed with that data, we are able to now adapt the “fake columns” strategy to our fluid grid. First, we’ll convert that transition level right into a percentage-based worth relative to our weblog module’s width. And to take action, our goal · context = consequence formulation comes into play but once more. We’ve got our goal worth of 568px, and the width of the design—our context—is 900px. And if we plug these two values into our stalwart formulation:
568 · 900 = 0.631111111111111That’s proper: one other impossibly lengthy quantity, which converts to a proportion of 63.1111111111111%.
Maintain that proportion at the back of your thoughts for a second. Now, let’s open up your favourite picture editor, and create a foolishly huge doc—say, one which’s 3000 pixels throughout. And since we’re going to tile this picture vertically, its top is just 160px tall.
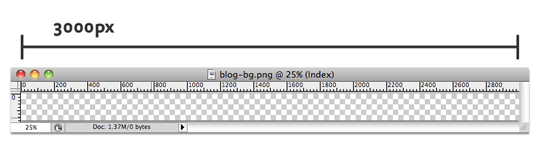
Fig 3.12: A monstrously massive canvas that we’ll (shortly) flip into our background graphic.
In a second, we’re going to show this clean doc into our background graphic. However why is it so massive? Nicely, this picture must be bigger than we are able to moderately assume the browser window will ever be. And until you’re studying this from the twenty fifth century in your wall-sized show fabricated from, I don’t know, holograms or no matter, I’m assuming your monitor’s not fairly that huge.
To create the columns themselves, we’ll want to use the transition level proportion (63.1111111111111%) to our new, wider canvas. So if we’re working with a graphic that’s 3000px throughout, we merely have to multiply that width by the proportion, like so:
3000 x 0.631111111111111 = 1893.333333333333We’re left with 1893.333333333333 as our consequence. And since Photoshop doesn’t deal in something lower than complete pixels, let’s spherical that all the way down to 1893 pixels. Armed with that quantity, we’ll recreate our textures in our clean picture, switching from white to grey on the 1893rd pixel.
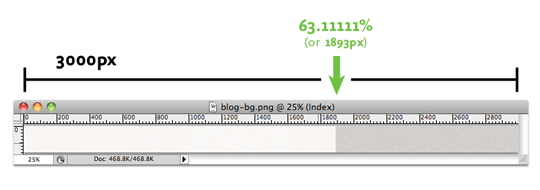
Fig 3.13: We’ve utilized that proportion to our oh-so-wide background graphic, creating our tile-ready columns.
How does that assist us? Nicely, what we’ve simply executed is to proportionally scale our transition level as much as this new, wider canvas. So we are able to take that new pixel worth, and use it to create our columns: the white column can be 1893px huge, with the grey column filling up the rest.
So now there’s just one factor left to do: drop our newly minted graphic into our stylesheet.
.weblog {
  background: #F8F5F2 url("blog-bg.png") repeat-y 63.1111111111111% 0;
  /* 568px / 900px */
}
As in Dan’s unique method, we’re nonetheless positioning the graphic on the very high of our weblog, after which repeating it vertically down the width of the module (repeat-y). However the background-position worth reuses our transition level proportion (63.1111111111111% 0), preserving the columns firmly in place as our design resizes itself.
And with that, we’ve bought fake columns working superbly in a fluid format. All because of Dan Cederholm’s unique strategy, augmented with somewhat proportional pondering.
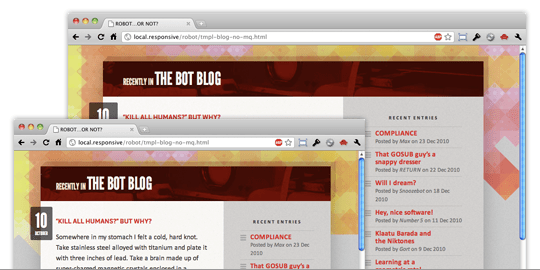
fig 3.14: Our flexibly fake columns.
Totally versatile background pictures?#section9
After all, our versatile fake column isn’t actually versatile: we’re merely utilizing percentages to place a background picture in such a manner that the columns seem to resize with their container. The picture’s dimensions haven’t modified in any respect.
However what a few background picture that truly does have to resize with the format? Maybe you’ve positioned a brand on an h1 aspect’s background, or used sprites to create rollovers to your web site’s navigation. Can we resize pictures that have to reside within the background?
Nicely, form of. There’s a CSS3 property known as background-size, which might enable us to create actually versatile background pictures, however—you guessed it—browser help continues to be fairly immature.
Within the interim, there are some moderately ingenious JavaScript-based options on the market: for instance, Scott Robbin’s jQuery Backstretch plugin simulates resizable background pictures on the physique aspect. And as you’ll see within the subsequent chapter, CSS3 media queries may be used to use totally different background pictures tailor-made to totally different decision ranges. So whereas background-size won’t be out there but, the sky is, as the children say, the restrict.