Earlier than we do something with a web page, you and I have to have a speak about one thing crucial: the Doc Object Mannequin. There are two functions to the DOM: offering JavaScript with a map of all the weather on our web page, and offering us with a set of strategies for accessing these components, their attributes, and their contents.
Article Continues Beneath
The “object” a part of Doc Object Mannequin ought to make much more sense now than it did the primary time the DOM got here up, although: the DOM is a illustration of an internet web page within the type of an object, made up of properties that signify every of the doc’s baby components and subproperties representing every of these components’ baby components, and so forth. It’s objects all the best way down.
window: The International Context#section2
All the pieces we do with JavaScript falls inside the scope of a single object: window. The window object represents, predictably sufficient, the whole browser window. It accommodates the whole DOM, in addition to—and that is the tough half—the entire of JavaScript.
After we first talked about variable scope, we touched on the idea of there being “world” and “native” scopes, that means {that a} variable might be made accessible both to each a part of our scripts or to their enclosing perform alone.
The window object is that world scope. All the features and strategies constructed into JavaScript are constructed off of the window object. We don’t need to reference window continually, after all, otherwise you would’ve seen a whole lot of it prior to now—since window is the worldwide scope, JavaScript checks window for any variables we haven’t outlined ourselves. The truth is, the console object that you simply’ve hopefully come to know and love is a technique of the window object:
window.console.log
perform log() { [native code] }
It’s exhausting to visualise globally vs. regionally scoped variables earlier than understanding about window, however a lot simpler after: after we introduce a variable to the worldwide scope, we’re making it a property of window—and since we don’t explicitly need to reference window every time we’re accessing one in all its properties or strategies, we are able to name that variable wherever in our scripts by simply utilizing its identifier. After we entry an identifier, what we’re actually doing is that this:
perform ourFunction() { var localVar = "I’m native."; globalVar = "I’m world."; return "I’m world too!"; };undefinedwindow.ourFunction();I’m world too!window.localVar;undefinedwindow.globalVar;I’m world.
The DOM’s whole illustration of the web page is a property of window: particularly, window.doc. Simply coming into window.doc in your developer console will return the entire markup on the present web page in a single huge string, which isn’t significantly helpful—however every thing on the web page could be accessed as subproperties of window.doc the very same manner. Keep in mind that we don’t have to specify window as a way to entry its doc property—window is the one sport on the town, in any case.
doc.head
<head>...</head>
doc.physique
<physique>...</physique>
These two properties are themselves objects that include properties which are objects, and so forth down the chain. (“All the pieces is an object, kinda.”)
The objects in window.doc make up JavaScript’s map of the doc, however it isn’t terribly helpful for us—a minimum of, not after we’re attempting to entry DOM nodes the best way we’d entry another object. Winding our manner via the doc object manually could be an enormous headache for us, and which means our scripts would fully disintegrate as quickly as any markup modified.
However window.doc isn’t only a illustration of the web page; it additionally supplies us with a wiser API for accessing that info. As an example, if we need to discover each p factor on a web page, we don’t have to write down out a string of property keys—we use a helper technique constructed into doc that gathers all of them into an array-like listing for us. Open up any website you need—as long as it probably has a paragraph factor or two in it—and do this out in your console:
doc.getElementsByTagName( "p" );
[<p>...</p>, <p>...</p>, <p>...</p>, <p>...</p>]Since we’re coping with such acquainted knowledge varieties, we have already got some thought how one can work with them:
var paragraphs = doc.getElementsByTagName( "p" );
undefined
paragraphs.size
4
paragraphs[ 0 ];
<p>...</p>However DOM strategies don’t give us arrays, strictly talking. Strategies like getElementsByTagName return “node lists,” which behave rather a lot like arrays. Every merchandise in a nodeList refers to a person node within the DOM—like a p or a div—and can include various DOM-specific strategies inbuilt. For instance, the innerHTML technique will return any markup a node accommodates—components, textual content, and so forth—as a string:
var paragraphs = doc.getElementsByTagName( "p" ),
    lastIndex = paragraphs.size – 1, /* Use the size of the `paragraphs` node listing minus 1 (due to zero-indexing) to get the final paragraph on the web page */
    lastParagraph = paragraphs[ lastIndex ];

lastParagraph.innerHTML;
And that’s how I spent my summer time trip.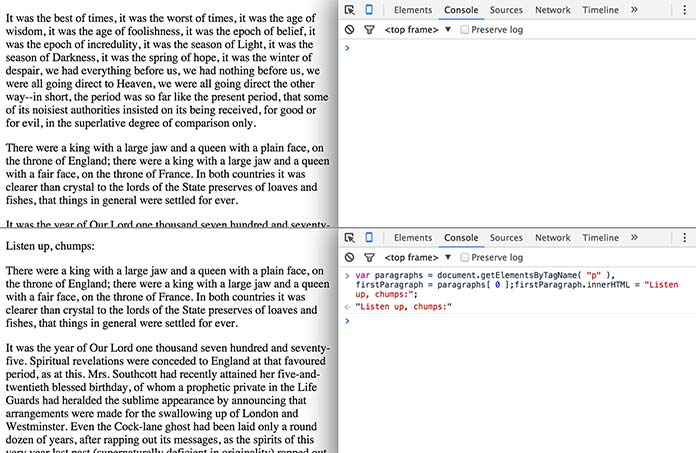
The identical manner these strategies give us entry to info on the rendered web page, they permit us to change that info, as effectively. For instance, the innerHTML technique does this the identical manner we’d change the worth of another object: a single equals signal, adopted by the brand new worth.
var paragraphs = doc.getElementsByTagName( "p" ),
    firstParagraph = paragraphs[ 0 ];

firstParagraph.innerHTML = "Pay attention up, chumps:";
"Pay attention up, chumps:"
JavaScript’s map of the DOM works each methods: doc is up to date every time any markup adjustments, and our markup is up to date every time something inside doc adjustments (Fig 5.1).
Likewise, the DOM API offers us various strategies for creating, including, and eradicating components. They’re all kind of spelled out in plain English, so regardless that issues can appear a bit of verbose, it isn’t too exhausting to interrupt down.
Earlier than we get began, let’s abandon our developer console for a bit. Ages in the past now, we walked via establishing a bare-bones HTML template that pulls in a distant script, and we’re going to revisit that setup now. Between the information you’ve gained about JavaScript thus far and an introduction to the DOM, we’re performed with simply telling our console to parrot issues again to us—it’s time to construct one thing.
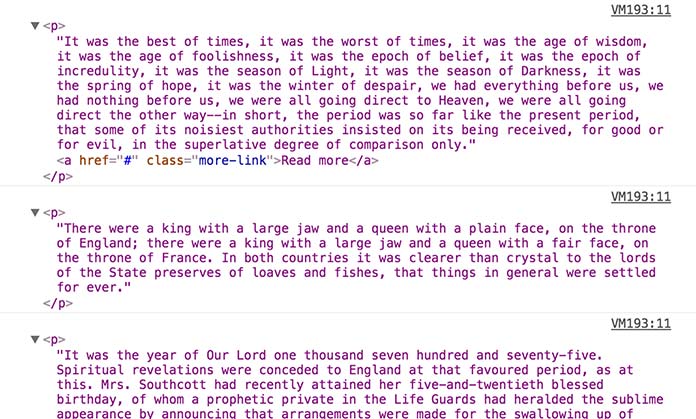
We’re going so as to add a “lower” to an index web page stuffed with textual content—a teaser paragraph adopted by a hyperlink to disclose the complete textual content. We’re not going to make the consumer navigate to a different web page, although. As an alternative, we’ll use JavaScript to point out the complete textual content on the identical web page.
Let’s begin by establishing an HTML doc that hyperlinks out to an exterior stylesheet and exterior script file—nothing fancy. Each our stylesheet and script information are empty with .css and .js extensions, for now—I prefer to hold my CSS in a /css subdirectory and my JavaScript in a /js subdirectory, however do no matter makes you most comfy.
<!DOCTYPE html>
<html>
    <head>
        <meta charset="utf-8">
        <hyperlink rel="stylesheet" sort="textual content/css" href="https://alistapart.com/article/javascript-for-web-designers/css/fashion.css">
    </head>
    <physique>

        <script src="js/script.js"></script>
    </physique>
</html>
We’re going to populate that web page with a number of paragraphs of textual content. Any ol’ textual content you could find laying round will do, together with—with apologies to the content material strategists within the viewers—a bit of old school lorem ipsum. We’re simply mocking up a fast article web page, like a weblog put up.
<!DOCTYPE html>
<html>
    <head>
        <meta charset="utf-8">
        <hyperlink rel="stylesheet" sort="textual content/css" href="https://alistapart.com/article/javascript-for-web-designers/css/fashion.css">
    </head>
    <physique>
        <h1>JavaScript for Net Designers</h1>

        <p>In all equity, I ought to begin this ebook with an apology—to not you, reader, although I don’t doubt that I’ll owe you a minimum of one by the point we get to the tip. I owe JavaScript various apologies for the issues I’ve stated to it throughout the early years of my profession, a few of which have been sturdy sufficient to etch glass.</p>

        <p>That is my not-so-subtle manner of claiming that JavaScript generally is a tough factor to study.</p>

        [ … ]

        <script src="js/script.js"></script>
    </physique>
</html>
Be at liberty to open up the stylesheet and play with the typography, however don’t get too distracted. We’ll want to write down a bit of CSS later, however for now: we’ve obtained scripting to do.
We are able to break this script down into a couple of discrete duties: we have to add a Learn Extra hyperlink to the primary paragraph, we have to disguise all of the p components aside from the primary one, and we have to reveal these hidden components when the consumer interacts with the Learn Extra hyperlink.
We’ll begin by including that Learn Extra hyperlink to the tip of the primary paragraph. Open up your still-empty script.js file and enter the next:
var newLink = doc.createElement( "a" );First, we’re intializing the variable newLink, which makes use of doc.createElement( "a" ) to—identical to it says on the tin—create a brand new a factor. This factor doesn’t actually exist wherever but—to get it to seem on the web page we’ll want so as to add it manually. First, although, <a></a> with none attributes or contents isn’t very helpful. Earlier than including it to the web page, let’s populate it with no matter info it wants.
We may do that after including the hyperlink to the DOM, after all, however there’s no sense in making a number of updates to the factor on the web page as an alternative of 1 replace that provides the ultimate end result—doing all of the work on that factor earlier than dropping it into the web page helps hold our code predictable.
Making a single journey to the DOM every time attainable can be higher for efficiency—however efficiency micro-optimization is simple to obsess over. As you’ve seen, JavaScript continuously presents us a number of methods to do the identical factor, and a kind of strategies might technically outperform the opposite. This invariably results in “excessively intelligent” code—convoluted loops that require in-person explanations to make any sense in any respect, only for the sake of shaving off treasured picoseconds of load time. I’ve performed it; I nonetheless catch myself doing it; however you need to attempt to not. So whereas making as few round-trips to the DOM as attainable is an efficient behavior to be in for the sake of efficiency, the principle cause is that it retains our code readable and predictable. By solely making journeys to the DOM after we actually need to, we keep away from repeating ourselves and we make our interplay factors with the DOM extra apparent for future maintainers of our scripts.
So. Again to our empty, attribute-less <a></a> floating within the JavaScript ether, completely unbiased of our doc.
Now we are able to use two different DOM interfaces to make that hyperlink extra helpful: setAttribute to present it attributes, and innerHTML to populate it with textual content. These have a barely completely different syntax. We are able to simply assign a string utilizing innerHTML, the best way we’d assign a worth to another object. setAttribute, alternatively, expects two arguments: the attribute and the worth we wish for that attribute, in that order. Since we don’t truly plan to have this hyperlink go wherever, we’ll simply set a hash because the href—a hyperlink to the web page you’re already on.
var newLink = doc.createElement( "a" );

newLink.setAttribute( "href", "#" );
newLink.innerHTML = "Learn extra";
You’ll discover we’re utilizing these interfaces on our saved reference to the factor as an alternative of on doc itself. All the DOM’s nodes have entry to strategies like those we’re utilizing right here—we solely use doc.getElementsByTagName( "p" ) as a result of we need to get all of the paragraph components within the doc. If we solely needed to get all of the paragraph components inside a sure div, we may do the identical factor with a reference to that div—one thing like ourSpecificDiv.getElementsByTagName( "p" );. And since we’ll need to set the href attribute and the inside HTML of the hyperlink we’ve created, we reference these properties utilizing newLink.setAttribute and newLink.innerHTML.
Subsequent: we wish this hyperlink to return on the finish of our first paragraph, so our script will want a technique to reference that first paragraph. We already know that doc.getElementsByTagName( "p" ) offers us a node listing of all of the paragraphs within the web page. Since node lists behave like arrays, we are able to reference the primary merchandise within the node listing one by utilizing the index 0.
var newLink = doc.createElement( "a" );
var allParagraphs = doc.getElementsByTagName( "p" );
var firstParagraph = allParagraphs[ 0 ];

newLink.setAttribute( "href", "#" );
newLink.innerHTML = "Learn extra";
For the sake of holding our code readable, it’s a good suggestion to initialize our variables up on the high of a script—even when solely by initializing them as undefined (by giving them an identifier however no worth)—if we plan to assign them a worth afterward. This fashion we all know all of the identifiers in play.
So now we’ve every thing we’d like as a way to append a hyperlink to the tip of the primary paragraph: the factor that we need to append (newLink) and the factor we need to append it to (firstParagraph).
One of many built-in strategies on all DOM nodes is appendChild, which—because the identify implies—permits us to append a baby factor to that DOM node. We’ll name that appendChild technique on our saved reference to the primary paragraph within the doc, passing it newLink as an argument.
var newLink = doc.createElement( "a" );
var allParagraphs = doc.getElementsByTagName( "p" );
var firstParagraph = allParagraphs[ 0 ];
newLink.setAttribute( "href", "#" );
newLink.innerHTML = "Learn extra";
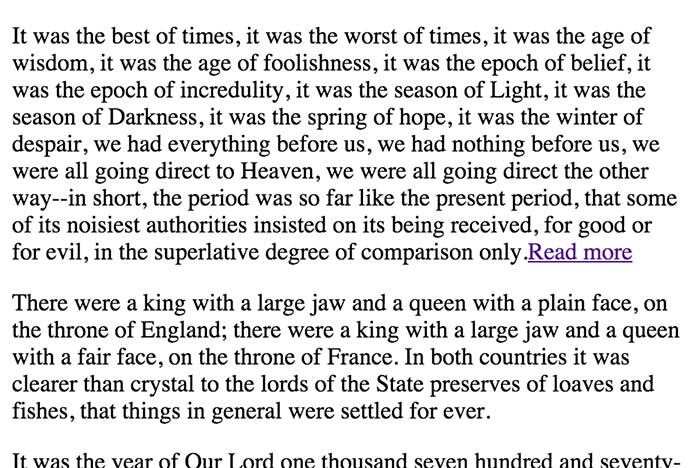
firstParagraph.appendChild( newLink );Now—lastly—we’ve one thing we are able to level at after we reload the web page. If every thing has gone in line with plan, you’ll now have a Learn Extra hyperlink on the finish of the primary paragraph on the web page. If every thing hasn’t gone in line with plan—due to a misplaced semicolon or mismatched parentheses, for instance—your developer console offers you a heads-up that one thing has gone flawed, so be sure you hold it open.
Fairly shut, however a bit of janky-looking—our hyperlink is crashing into the paragraph above it, since that hyperlink is show: inline by default (Fig 5.2).
We’ve got a few choices for coping with this: I received’t get into all the assorted syntaxes right here, however the DOM additionally offers us entry to styling details about components—although, in its most elementary type, it’ll solely permit us to learn and alter styling info related to a fashion attribute. Simply to get a really feel for a way that works, let’s change the hyperlink to show: inline-block and add a couple of pixels of margin to the left facet, so it isn’t colliding with our textual content. Identical to setting attributes, we’ll do that earlier than we add the hyperlink to the web page:
var newLink = doc.createElement( "a" );
var allParagraphs = doc.getElementsByTagName( "p" );
var firstParagraph = allParagraphs[ 0 ];

newLink.setAttribute( "href", "#" );
newLink.innerHTML = "Learn extra";
newLink.fashion.show = "inline-block";
newLink.fashion.marginLeft = "10px";

firstParagraph.appendChild( newLink );
Properly, including these strains labored, however not with out a few catches. First, let’s speak about that syntax (Fig 5.3).
Keep in mind that identifiers can’t include hyphens, and since every thing is an object (kind of), the DOM references kinds in object format as effectively. Any CSS property that accommodates a hyphen as an alternative will get camel-cased: margin-left turns into marginLeft, border-radius-top-left turns into borderRadiusTopLeft, and so forth. For the reason that worth we set for these properties is a string, nevertheless, hyphens are simply superb. A little bit awkward and yet another factor to recollect, however that is manageable sufficient—actually no cause to keep away from styling in JavaScript, if the scenario makes it completely mandatory.
A greater cause to keep away from styling in JavaScript is to keep up a separation of conduct and presentation. JavaScript is our “behavioral” layer the best way CSS is our “presentational” layer, and infrequently the twain ought to meet. Altering kinds on a web page shouldn’t imply rooting via line after line of features and variables, the identical manner we wouldn’t need to bury kinds in our markup. The individuals who would possibly find yourself sustaining the kinds for the positioning will not be fully comfy enhancing JavaScript—and since altering kinds in JavaScript means we’re not directly including kinds by way of fashion attributes, no matter we write in a script goes to override the contents of a stylesheet by default.
We are able to preserve that separation of issues by as an alternative utilizing setAttribute once more to present our hyperlink a category. So, let’s scratch out these two styling strains and add one setting a category of their place.
var newLink = doc.createElement( "a" );
var allParagraphs = doc.getElementsByTagName( "p" );
var firstParagraph = allParagraphs[ 0 ];
newLink.setAttribute( "href", "#" );
newLink.setAttribute( "class", "more-link" );
newLink.innerHTML = "Learn extra";
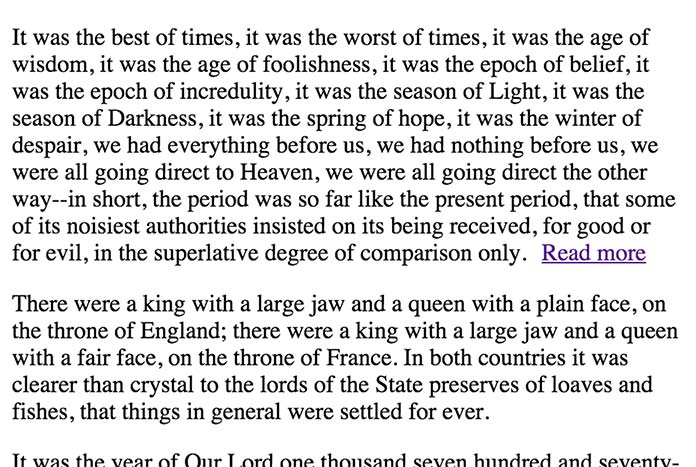
firstParagraph.appendChild( newLink );Now we are able to fashion .more-link in our stylesheets as ordinary:
.more-link {
    show: inline-block;
    margin-left: 10px;
}
Significantly better (Fig 5.4). It’s value holding in thoughts for the long run that utilizing setAttribute this manner on a node within the DOM would imply overwriting any courses already on the factor, however that’s not a priority the place we’re placing this factor collectively from scratch.

Now we’re prepared to maneuver on to the second merchandise on our to-do listing: hiding all the opposite paragraphs.
Since we’ve made adjustments to code we all know already labored, be sure you reload the web page to ensure every thing continues to be working as anticipated. We don’t need to introduce a bug right here and proceed on writing code, or we’ll finally get caught digging again via all of the adjustments we made. If every thing has gone in line with plan, the web page ought to look the identical after we reload it now.
Now we’ve an inventory of all of the paragraphs on the web page, and we have to act on every of them. We want a loop—and since we’re iterating over an array-like node listing, we’d like a for loop. Simply to ensure we’ve our loop so as, we’ll log every paragraph to the console earlier than we go any additional:
var newLink = doc.createElement( "a" );
var allParagraphs = doc.getElementsByTagName( "p" );
var firstParagraph = allParagraphs[ 0 ];

newLink.setAttribute( "href", "#" );
newLink.setAttribute( "class", "more-link" );
newLink.innerHTML = "Learn extra";

for( var i = 0; i < allParagraphs.size; i++ ) {
    console.log( allParagraphs[ i ] );
}

firstParagraph.appendChild( newLink );
Your Learn Extra hyperlink ought to nonetheless be kicking round within the first paragraph as ordinary, and your console ought to be wealthy with filler textual content (Fig 5.5).
Now we’ve to cover these paragraphs with show: none, and we’ve a few choices: we may use a category the best way we did earlier than, however it wouldn’t be a horrible thought to make use of kinds in JavaScript for this. We’re controlling all of the hiding and exhibiting from our script, and there’s no probability we’ll need that conduct to be overridden by one thing in a stylesheet. On this case, it is smart to make use of the DOM’s built-in strategies for making use of kinds:
var newLink = doc.createElement( "a" );
var allParagraphs = doc.getElementsByTagName( "p" );
var firstParagraph = allParagraphs[ 0 ];

newLink.setAttribute( "href", "#" );
newLink.setAttribute( "class", "more-link" );
newLink.innerHTML = "Learn extra";

for( var i = 0; i < allParagraphs.size; i++ ) {
    allParagraphs[ i ].fashion.show = "none";
}

firstParagraph.appendChild( newLink );
If we reload the web page now, every thing is gone: our JavaScript loops via the whole listing of paragraphs and hides all of them. We have to make an exception for the primary paragraph, and which means conditional logic—an if assertion, and the i variable offers us a straightforward worth to examine towards:
var newLink = doc.createElement( "a" );
var allParagraphs = doc.getElementsByTagName( "p" );
var firstParagraph = allParagraphs[ 0 ];

newLink.setAttribute( "href", "#" );
newLink.setAttribute( "class", "more-link" );
newLink.innerHTML = "Learn extra";

for( var i = 0; i < allParagraphs.size; i++ ) {

    if( i === 0 ) {
            proceed;
    }
    allParagraphs[ i ].fashion.show = "none";
}

firstParagraph.appendChild( newLink );
If that is the primary time via of the loop, the proceed key phrase skips the remainder of the present iteration after which—not like if we’d used break—the loop continues on to the following iteration.
For those who reload the web page now, we’ll have a single paragraph with a Learn Extra hyperlink on the finish, however all of the others will likely be hidden. Issues are trying good thus far—and if issues aren’t trying fairly so good for you, double-check your console to ensure nothing is amiss.
Now that you simply’ve obtained a strong grounding within the DOM, let’s actually dig in and see the place to take it from right here.
The remainder of this chapter (much more than you simply learn!) goes even deeper—and that’s just one chapter out of Mat’s hands-on, help-you-with-your-current-project information. Try the remainder of JavaScript for Net Designers at A Guide Aside.