With lots of of frameworks and UI kits, we at the moment are assembling all types of content material blocks to make internet pages. Nevertheless, such modularity and flexibility hasn’t been achieved on the internet factor stage but. Studying from Lego, we will push modular internet design one step ahead.
Article Continues Under
Rethinking the established order#section2
Modular atomic design has been round for some time. Conceptually, all of us like it—internet elements needs to be versatile and reusable. We should always be capable of place them like bricks, interlocking them nevertheless we would like with out worrying about altering any code.
To this point, we’ve got been doing it on the content material block stage—each block occupies a full row, has a constant width, and is self-contained. We at the moment are in a position to assemble totally different blocks to make internet pages with out having to think about the types and components inside every block. That’s an awesome step ahead. And it has led to an explosion of frameworks and UI kits, making internet web page design extra modular and likewise extra accessible to the lots.
Attaining comparable modularity on the internet factor stage will not be as straightforward. Sample Lab says we should always be capable of put UI patterns inside one another like Russian nesting dolls. However serious about Russian nesting dolls, each layer has its personal thickness—the equal of padding and margin in internet design. When a three-layer doll is put subsequent to a seven-layer doll, the spacing in between is uneven. Whereas it’s not a difficulty specifically with dolls, on internet pages, that would result in both uneven white area or multilevel CSS overrides.
I’ve been utilizing Bootstrap and Basis for years, and that’s precisely what would occur once I’d attempt to write complicated layouts inside these frameworks—rows nested in columns nested in rows, small components in bigger ones, all with paddings and margins of their very own like Russian dolls. Then I might tài khoản for the nesting points, take out the extreme padding on first- and last-child, calculate, override, add feedback right here and there.
It was not the prettiest factor I may do to my stylesheets, nevertheless it was nonetheless tolerable. Then I joined Graphiq, a data firm delivering knowledge visualizations throughout greater than 700 totally different subjects. Right here, content material editors are allowed to place in any knowledge they need, in any format they need, to create one of the best expertise attainable for his or her readers. Such flexibility is smart for the small startup and we’ve got a drag and drop interface to assist set up every little thing from a single knowledge level to infographics and charts, to columns, blocks, and playing cards. Content material editors also can add logic to the format of the web page. Two comparable bar charts proper subsequent to one another may find yourself being in fairly totally different HTML buildings. As you may think about, this stage of versatility oftentimes ends in a styling hell for the designers and builders. Although a really promising answer—CSS Grid Format—is on the horizon, it hasn’t made its technique to Chrome but. And it would take years for us to totally adapt to a brand new show attribute. That led me to pondering if we will change the Russian doll mentality, we will take one step additional towards modular design with the instruments out there.
To discover a higher metaphor, I went again to Lego—the epitome of modular atomic design. Seems we don’t ever want to fret about padding and margin once we “nest” a small Lego construction in a big Lego construction, after which in a good bigger Lego construction. In truth, there is no such thing as a such idea as “nesting” in Lego. All the weather seem to stay on the identical stage, not in a number of layers.
However what does that imply for internet design? We’ve to nest internet components for the semantic construction and for straightforward choosing. I’m not saying that we should always change our HTML buildings, however in our stylesheet, we may put spacing solely on the lowest-level internet components (or “atoms” to cite atomic design phrases) and never the numerous layers in between.
Check out the highest of any particular person Lego brick. In case you see the area across the outdoors of the pegs because the padding of an online factor, and every little thing contained in the padding because the content material, one can find that each one Lego bricks have a constant padding surrounding the content material, which is strictly half of the hole between components.
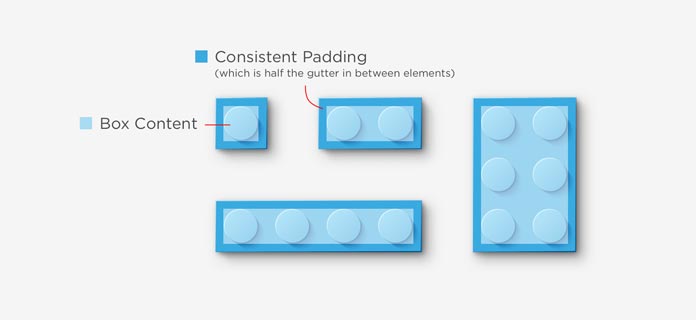
And when Lego bricks are positioned collectively, all the weather could have the identical gutter in between.
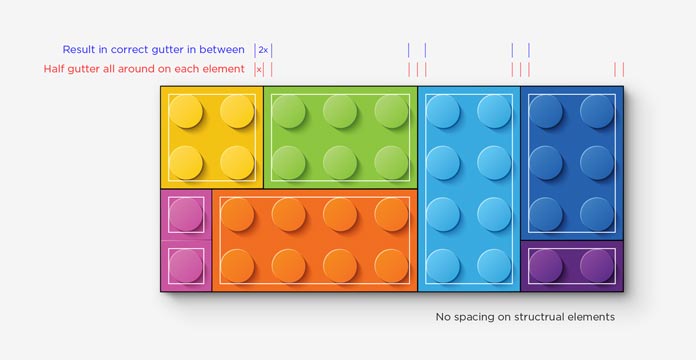
No different padding or margin wanted; the gaps are naturally fashioned. All the weather—irrespective of how deeply they’re nested—seem like on the identical stage and want no CSS override or adjustment, not even the first- and last-child reset.
Placing it in code, we will make a category that provides the half-gutter spacing, and apply it to all of the lowest-level internet components on the web page. Then we will take away all of the spacing on structural divs like .row and .col.
$gutter: 20px;
.factor {
	 padding: $gutter / 2;
}
One tiny tweak to be aware of is that when the padding is barely on .factor, the padding between the outermost components and the father or mother div would solely be half the gutter.

We have to add the identical padding to the outermost container as properly.
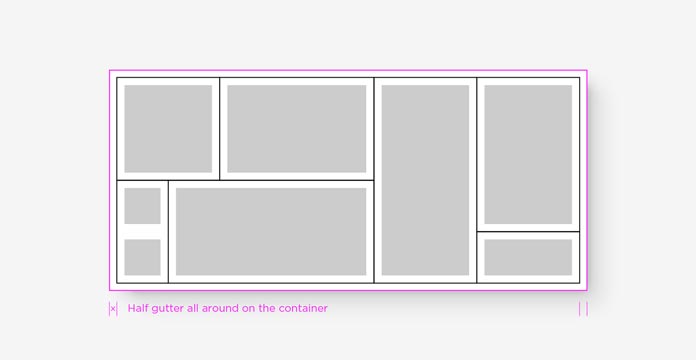
$gutter: 20px;
.container,
.factor {
padding: $gutter / 2;
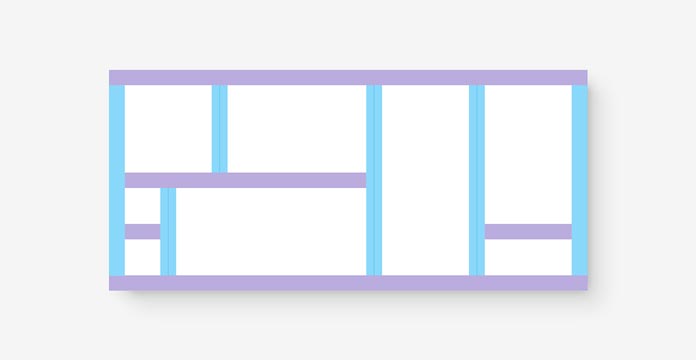
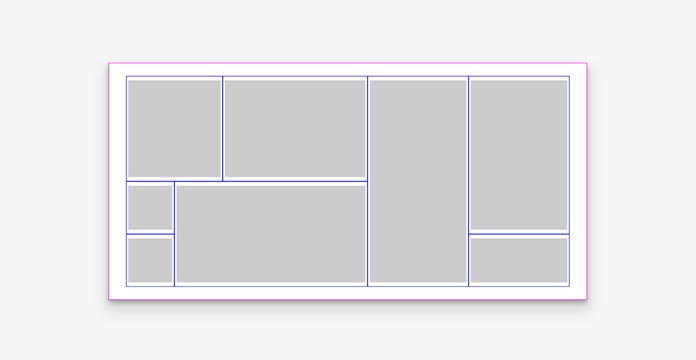
}And that can consequence on this:

Take into consideration what number of layers of overrides we would wish to create this format with the present rows and columns mentality. The very best we will do might be one thing like this:
And in code:
See the Pen Advanced format the previous means by Samantha Zhang (@moyicat) on CodePen.
With the Lego mentality, the spacing and the code will be a lot easier, as proven within the two examples under:
Instance with div:
See the Pen Advanced format with div by Samantha Zhang (@moyicat) on CodePen.
Instance with Flexbox:
See the Pen Advanced format with flexbox by Samantha Zhang (@moyicat) on CodePen.
Extra versatile than Lego#section4
Lego is a real one-size-fits-all answer. With Lego, we don’t get to tweak the padding of the bricks in response to our tasks, and we will’t have totally different horizontal and vertical padding. Internet design gives us rather more variation on this space.
As an alternative of simply setting one worth because the gutter, we will set 4 totally different variables and get extra versatile format this manner:
$padding-x: 10px;
$padding-y: 20px;
$padding-outer-x: 40px;
$padding-outer-y: 30px;
.container {
padding: $padding-outer-y $padding-outer-x;
}
.factor {
padding: ($padding-y / 2) ($padding-x / 2);
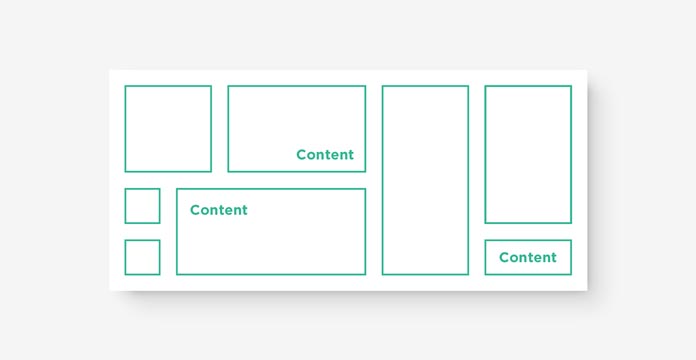
}The consequence appears to be like like this:
It’s nonetheless modular, but in addition has various areas to create a extra dynamic type.
With responsive design, we may additionally need totally different spacing for various media queries. We are able to take our strategy one step additional and write our logic right into a Sass mixin (alternatively you are able to do it with LESS, too):
@mixin format ($var) {

  $padding-x: map-get($var, padding-x);
  $padding-y: map-get($var, padding-y);
  $padding-outer-x: map-get($var, padding-outer-x);
  $padding-outer-y: map-get($var, padding-outer-y);

  .container {
    padding: $padding-outer-y $padding-outer-x;
  }
  .factor {
    padding: ($padding-y / 2) ($padding-x / 2);
  }
}
Utilizing this mixin, we will plug in numerous spacing maps to generate CSS guidelines for various media queries:
// Spacing variables
$spacing: (
  padding-x: 10px,
  padding-y: 20px,
  padding-outer-x: 40px,
  padding-outer-y: 30px
);
$spacing-tablet: (
  padding-x: 5px,
  padding-y: 10px,
  padding-outer-x: 20px,
  padding-outer-y: 15px
);


// Generate default CSS guidelines
@embody format($spacing);


// Generate CSS guidelines for pill view
@media (max-width: 768px) {
  @embody format($spacing-tablet);
}
And as straightforward as that, all our components will now have totally different spacing in desktop and pill view.
Reside instance:
See the Pen Advanced format with mixin and ranging gutter by Samantha Zhang (@moyicat) on CodePen.
After utilizing this methodology for nearly a 12 months, I’ve encountered a couple of frequent questions and edge circumstances that I’d like to handle as properly.
Background and borders#section6
When including backgrounds and borders to the net components, don’t apply it to the .factor div. The background will cowl each the content material and padding areas of the factor, so it’s going to visually break the grid like this:

.factor breaks the grid.As an alternative, apply the background to a baby div throughout the .factor div:
<div class="factor">
  <div type="background-image:url();"></div>
</div>
div incorporates the picture so it doesn’t break the grid.I used this construction in all my examples above.
Equally, the border goes across the padding within the field mannequin, so we must also apply the border of the factor to a baby div to keep up the right spacing.
div.Full row components#section7
One other frequent subject happens as a result of we often need full row components, conceptually like this:

To type full row components following the .container and .factor construction, we have to make use of destructive margin:
.element-full-row {
  margin: 0 (-$padding-outer-x);
  padding: ($padding-y / 2) ($padding-x / 2 + $padding-outer-x);
}
Discover that we have to add again the $padding-outer-x to the padding, in order that the content material in .element-full-row and the content material in .factor align.
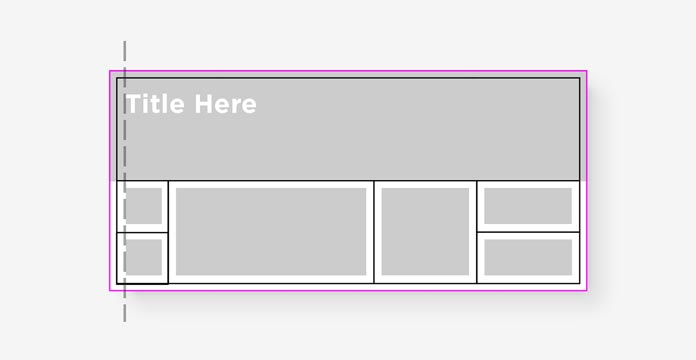
.element-full-row and the content material in .factor align.The code above handles the horizontal spacing, and the identical logic will be utilized to take over vertical spacing as properly (as proven within the instance above–the header factor takes excessive padding). We are able to additionally add a destructive margin very simply in our stylesheets.
.element-full-row:first-child {
  margin: (-$padding-outer-y) (-$padding-outer-x) 0;
  padding: ($padding-y / 2 + $padding-outer-y) ($padding-x / 2 + $padding-outer-x) ($padding-y / 2);
}
It may be utilized as a standalone rule or be included within the Sass or LESS mixin, then you’ll by no means have to fret about them once more.
Nesting#section8
The complete freedom in nesting is the robust swimsuit of this Lego CSS methodology. Nevertheless, there’s one form of nesting we will’t do–we will’t ever nest an .factor inside an .factor. That can create double padding and the entire level of this methodology can be misplaced. That’s why we should always solely apply the .factor class to the bottom stage internet components (or “atoms” to cite atomic design phrases) like a button, enter field, textual content field, picture, and so forth.
Take this very generic remark field for example.
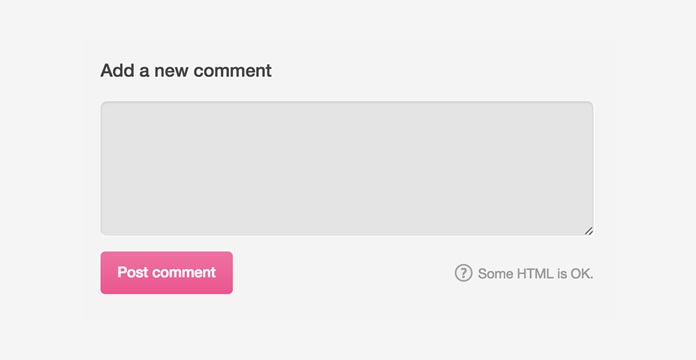
As an alternative of treating it as one “factor,” we have to deal with it as a pre-defined group of components (title, textarea, button, and helper textual content):
<div class="remark">
  <h3 class="comment-title factor">Add a brand new remark</h3>
  <textarea class="factor"></textarea>
  <div class="clearfix">
     <div class="float-left">
       <div class="factor">
         <button class="btn-post">Publish remark</button>
       </div>
     </div>
     <div class="float-right">
       <div class="helper-text factor">
         <i class="icon-question"></i>
           Some HTML is OK.
       </div>
     </div>
   </div>
</div>
Then, we will deal with .remark as one reusable part–or within the atomic design context, a “molecule”–that can play properly with different reusable elements written in the identical method, and will be grouped into larger stage HTML buildings. And irrespective of the way you set up them, the spacing amongst them will at all times be appropriate.
Various heights and layouts#section9
Within the bulk of this text, we’ve been utilizing the identical fitted row instance. This may occasionally lead some to suppose that this methodology solely works for components with outlined peak and width.
It’s extra versatile than that. Irrespective of how components change in peak and width, lazy load, or float round, the Lego-like padding will guarantee the identical constant hole between components.

See the Pen Pinterest Move by Samantha Zhang (@moyicat) on CodePen.
Upkeep#section10
A few of you may additionally be worrying concerning the upkeep price. Admittedly, it takes time to be taught this new methodology. However when you begin to undertake this mentality and write CSS this manner, the upkeep turns into very simple.
Particularly with the format mixin, all of the spacing guidelines are centralized and managed by a couple of teams of variables. A single change within the variables can be carried out to all the weather on the internet web page robotically.
As compared, we’d have to alter padding and margin in 20 totally different locations with the previous methodology, after which we’ve got to check to verify every little thing nonetheless works. It might be a way more hectic course of.
Grid format#section11
And eventually, there’s the Grid format, which helps very difficult layouts and nests rather more gracefully than block. You is perhaps pondering that is various exhausting work for an issue that’s really going away.
Whereas lots of the points we talked about on this article would possibly go away with Grid, it would take Grid years to get browser help. After which, it would take a very long time for the group to get aware of the brand new methodology and develop finest practices and frameworks round it. Like Flex–it’s already supported by most browsers, nevertheless it’s removed from broadly adopted.
And in spite of everything, it may take a typical internet person a very long time to know Grid and the way that works. Equally, it could require various improvement for us to translate person format enter into good CSS Grid code. The previous by-column and by-row methodology is means simpler to know, and when nesting will not be a difficulty, it may stand as a great answer for web sites that enable person configuration.
We began to implement this methodology at Graphiq at first of 2016. Nearly a 12 months in, we like it and consider that is how we should always write internet layouts sooner or later. As we refactor every web page, we’re deleting lots of of traces of previous CSS code and making the stylesheets far more logical and far simpler to learn. We additionally obtained far fewer format and spacing bugs in comparison with all our refactors prior to now. Now, irrespective of how our content material editors resolve to nest their knowledge factors, we’ve obtained little or no to fret about.
From what we’ve seen, it is a actual sport changer in how we take into consideration and code our layouts. When internet elements are modular like Lego bricks all the way down to the weather stage, they change into extra versatile and simpler to keep up. We consider it’s the subsequent step to soak up modular internet design. Attempt it for your self and it would change the best way you write your internet pages.