As corporations like Google and Yahoo! have simplified the method of putting data on a map by providing internet companies/APIs, the recognition and abundance of mapping functions on the internet has elevated dramatically. Whereas these maps have had a constructive impact on most customers, what does it imply for individuals with accessibility wants?
Article Continues Under
Most on-line mapping functions don’t deal with problems with internet accessibility. For a visually impaired internet person, these extremely visible maps are basically ineffective.
Is there a solution to show text-based information on a map, holding it accessible, helpful and visually enticing? Sure: utilizing an accessible CSS-based map during which the underlying map information is separated from the visible format.
A distinct place to begin#section2
So what if, as a substitute of ranging from a map graphic and including information to factors situated throughout the picture, we begin with the information itself and create a map based mostly on the information?
First, let’s choose some information that has a geographic part so it may be positioned on a map. For instance, let’s use the ten most populated cities on the earth. Displayed as plain textual content, the record would possibly appear to be this:
- Tokyo, Japan – 28,025,000 individuals
- Mexico Metropolis, Mexico – 18,131,000 individuals
- Mumbai, India – 18,042,000 individuals
- Sao Paulo, Brazil – 17,110,000 individuals
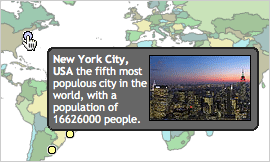
- New York Metropolis, USA – 16,626,000 individuals
- Shanghai, China – 14,173,000 individuals
- Lagos, Nigeria – 13,488,000 individuals
- Los Angeles, USA – 13,129,000 individuals
- Calcutta, India – 12,900,000 individuals
- Buenos Aires, Argentina – 12,431,000 individuals
Word: The info above is meant solely for example and is probably not solely correct.
Not unhealthy, however it will be good so as to add some descriptive textual content to every of the cities to explain slightly extra about them. So, an instance for only one metropolis is perhaps:
- Shanghai, China
- Shanghai, China is located on the banks of the Yangtze River and has a inhabitants of 14,173,000, making it the sixth most populated metropolis.
Organizing the information#section3
Now that we’ve added some descriptive data to town, let’s take into consideration easy methods to set up that information in HTML. A definition record (dl) can be a great way to prepare this data as a result of a dl has each definition time period (dt) and definition description (dd) youngster components. This implies we are able to have town’s title as a dt and town description as a dd. Let’s see how that may look:
<dl>
<dt><a href="http://en.wikipedia.org/wiki/Shanghaiphần trăm2C_China"
class="location" id="shanghai">Shanghai, China</a></dt>
<dd>Shanghai, China is located on the banks of the Yangtze
River and has a inhabitants of 14,173,000, making it the
sixth most populated metropolis.</dd>
...
Bringing the remainder of our information into the definition record provides us the entire record of 10 cities.
Word that the anchor hyperlink throughout the dt was given a class and distinctive id. The id permits us to refer to every metropolis individually, so we are able to find it on the map. We’ll come again to this slightly later.
So the place are we now? We’ve created an accessible text-based record of things and their definitions. The info is what we need to convey to the person, no matter whether or not they see it on a map or simply as textual content, so we’re in good condition. Now that we have now the knowledge organized, let’s make a degree map out of it.
In a degree map, there are three foremost objects which are visually displayed: the map, the purpose(s) on the map, and information to show when the person clicks on or hovers over a degree. We will very simply translate these visible objects to the text-based dl we simply created:
- Map picture =
dl - Map level(s) =
dt > a - Map level popup information =
dd
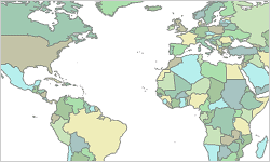
Step one in making dl right into a map is so as to add the background map picture with a mode. We’ll give the dl a class of “map” in order that solely these dls in a doc get styled this manner (in our instance, as a world map).
dl.map {
background: url(worldmap.png) no-repeat;
border: 1px strong #999;
margin: 0px;
padding: 0px;
text-align:left;
width: 550px;
top: 275px;
place: relative;
}
The subsequent step is so as to add a mode for the dts that may enable the anchors inside to be made into factors on the map:
dl.map dt {
show: inline;
}
Subsequent, we have to take care of the dd objects which would be the information displayed when a degree on the map is hovered over. We don’t want the dd to show till the a inside its related dt is hovered, so by default we have to conceal the dds. Since display readers will ignore an HTML component with a mode of show: none, we have to conceal the information by positioning it far-off from the browser’s view. The type for the dd will make the component appear to be a tooltip window:
dl.map dd {
background: #555;
border: 2px strong #222;
border-radius: 8px; /* CSS3 rounded corners */
-moz-border-radius: 8px; /* Mozilla rounded corners */
colour: #fff;
padding: 4px;
width: 200px;
place: absolute;
left: -9999px;
z-index: 11;
}
Every of the dts comprises an a which, by default, takes a person to the Wikipedia article similar to town; this hyperlink is what’s going to set off the tooltip to show the dd. The hyperlink can be displayed as a degree and the hyperlink textual content can be invisible, so once more we have to transfer the textual content out of the browser’s view. Every level can even have a special location, however we’ll handle that within the subsequent step. The bottom type for the anchor hyperlinks appears like this:
dl.map a.location {
background: url(level.png) no-repeat;
show: block;
define: none;
text-decoration: none;
text-indent: -9999px;
width: 10px;
top: 10px;
place: absolute;
z-index: 10;
}
dl.map a.location:hover {
background: url(point-hover.png) no-repeat -1px -1px;
}
Lastly, we have to add types particular to every level on the map. These factors are represented by the anchor hyperlinks inside every of the dts. The position of every level can be achieved by assigning prime and left values (since we already positioned all of them completely within the above code snippet):
dl.map a#shanghai {
prime: 80px;
left: 484px;
}
dl.map a#tokyo {
prime: 105px;
left: 121px;
}
...
We’ve simply created a primary map, so let’s have a look at the place we’re with our first instance. This instance locations the factors on the map, however doesn’t show any data when a degree is hovered over.
Show the information as a tooltip#section5
Now that we have now a map with factors positioned, we have to show information when the factors are hovered over. To show a tooltip we’re going to have to make use of some JavaScript.
The JavaScript to indicate and conceal the dd “tooltip” does so by modifying the type of the dd related to the present a being hovered. A JavaScript perform named showTooltip() locations the dd again into the seen space of the browser by modifying its prime and left type values, based mostly on the situation of the related a level.
It might be very simple for us to make use of inline occasion handlers like onmouseover and onmouseout to perform this, however that wouldn’t be very unobtrusive. We wish like our script to stay unbiased of our map and our markup. To try this we are able to have the JavaScript dynamically assign occasions to the anchor components.
However earlier than we dig into the JavaScript, let’s pause for a second to speak about JavaScript objects. The JavaScript used on this approach makes use of object literal notation, so studying the fundamentals of this may aid you perceive the way it all works. Here’s a primary instance of an object literal:
var particular person = {
title: "Homer Simpson",
say: "Doh!",
speak: perform(){
alert( this.say );
},
stroll: perform(){
// code
}
};
One of many advantages of utilizing objects in JavaScript is that we are able to use strategies and properties in a extra wise method. For instance, with the above code we are able to name a technique like particular person.speak() or get a property like particular person.title. Objects additionally enable us to reuse technique and property names with out inflicting battle. As an illustration, if we have been so as to add an animal object to the file above, it might even have an stroll technique (animal.stroll()) with out conflicting with the particular person.stroll() technique.
The script used to assign the occasions on this approach is a bit more sophisticated, however here’s a shortened skeleton of what this instance script appears like:
var mapMaker = {
offsetX:     -16,  // tooltip X offset
offsetY:     16,  // tooltip Y offset
init:        perform(){
// units up the maps
},
showTooltip: perform(){
// reveals the tooltip
},
hideTooltip: perform(){
// hides the tooltip
},
addEvt: perform( component, kind, handler ){
// provides the occasions
}
};
Now let’s dig a bit deeper into a number of the strategies. For the sake of brevity we won’t cowl each technique, however we’ll deal with the important thing ones.
The init() technique is our constructor. This implies the tactic is what we name to initialize our mapMaker object. It units up the map by including occasions to every of the anchor hyperlinks contained in the dts, making the tooltips attainable. Let’s have a look at the init technique:
init: perform(){
var i  = 0;
var ii = 0;
var location;
var DLs = doc.getElementsByTagName('dl');
whereas( DLs.size > i ){
if( DLs[i].className == 'map' ){
mapMaker.stripWhitespace( DLs[i] );
var DTs = DLs[i].getElementsByTagName( 'dt' );
whereas( DTs.size > ii ){
location = DTs[ii].firstChild;
mapMaker.addEvt( location, 'mouseover',
     mapMaker.showTooltip );
mapMaker.addEvt( location, 'mouseout',
     mapMaker.hideTooltip );
mapMaker.addEvt( location, 'focus',
     mapMaker.showTooltip );
mapMaker.addEvt( location, 'blur',
     mapMaker.hideTooltip );
ii++;
};
ii = 0;
}
i++;
};
},
The init technique first collects all the dl components within the doc through the use of doc.getElementsByTagName( 'dl' ) after which loops by way of every, searching for one with a class of “map”. When it finds one, it collects its dt components and loops by way of them, assigning occasion handlers (utilizing the addEvt() technique) to the anchor tag inside. The occasions we’ve accounted for embrace mouseover (which calls the showTooltip() technique) and mouseout (which calls the hideTooltip() technique) and mirrors the identical actions for the focus and blur occasions, respectively, to make the tooltip accessible for keyboard customers.
Now let’s take a more in-depth have a look at a portion of the showTooltip() technique; this technique shows the tooltip dd when a map level (dl.map > dt > a) is hovered. To show the proper tooltip, the perform should know which dd is related to every anchor. From the at present hovered anchor tag, this, we are able to transfer to its guardian dt tag (this.parentNode) then to that dt’s dd (this.parentNode.nextSibling) which is the tooltip we need to show:
showTooltip: perform(){
var a = this;
var tooltip = a.parentNode.nextSibling;
...
As soon as we all know which dd component ought to be displayed we are able to set the completely different type attributes to put the dd tooltip into view and transfer it into the proper location subsequent to the purpose:
  ...
// get width and top of background map
var mapWidth  = tooltip.parentNode.offsetWidth;
var mapHeight = tooltip.parentNode.offsetHeight;

// get width and top of the tooltip
var tooltipWidth = tooltip.offsetWidth;
var tooltipHeight = tooltip.offsetHeight;

// work out the place to put the tooltip based mostly on the purpose
var newX = a.offsetLeft + mapMaker.offsetX;
var newY = a.offsetTop + mapMaker.offsetY;

// test if tooltip matches map width & modify if obligatory
if( ( newX + tooltipWidth ) > mapWidth ){
tooltip.type.left = newX - tooltipWidth - 24 + 'px';
} else {
tooltip.type.left = newX + 'px';
}

//test if tooltip matches map top
if( ( newY + tooltipHeight ) > mapHeight ){
tooltip.type.prime = newY - tooltipHeight - 14 + 'px';
} else {
tooltip.type.prime = newY + 'px';
}
...
Within the script above the dd tooltip type is modified to convey the component again into the seen space of the map, however the script additionally takes into trương mục the dimensions of the map and positions the tooltip so it doesn’t go exterior the background map picture boundaries.
The final element we have to fear about is operating the script when the webpage has loaded. Sounds simple simply name window.onload = mapMaker.init() proper? Nicely you possibly can do this, but it surely doesn’t enable different scripts to run on web page load and it will be very nice to set off this script to run after the web page has loaded however earlier than all the pictures have downloaded. Fortunately, Dean Edwards has carried out the work for us on this one and you’ll take a look at his write-up of the approach for extra data.
Now we have now reviewed the most important components of this map instance’s JavaScript, however didn’t cowl each single perform within the script. The features for including occasions get pretty sophisticated and are exterior the scope of this text; nevertheless, you possibly can view your entire script right here.
Now that we have now added some JavaScript performance let’s have a look at the place we’re with this second map instance. We now have a visually pleasing map that gives extra element when the person hovers over a metropolis. In fact, as a result of this map is created from text-based information, the information displayed as a map could be learn by a display reader and convey the identical that means.
What about CSS on and JavaScript off?#section6
We have to deal with customers who’ve JavaScript turned off however use a browser with good CSS assist. We wish these customers to get the lo-fi, however useable textual content model of the map, as a result of with out JavaScript enabled they gained’t be capable to see the tooltips.
To allow the tooltips and the map type, the JavaScript init() technique could be tweaked to show the map “on.” If the map is just not “on,” it’s going to merely show as textual content solely. As we have now given our map dl a category of “map,” we’ll want so as to add a second class: “on.” We’ll additionally want ot replace our type sheet, including .on to every type rule like this:
dl.map.on {
background: url(worldmap.png) no-repeat;
border: 1px strong #999;
margin: 0px;
padding: 0px;
text-align:left;
width: 550px;
top: 275px;
place: relative;
}
The above type will solely have an effect on dls which have are class-ified as each “map” and “on” (<dl class="map on">) and won’t have an effect on any dls with solely a class of “map.” You may see this in motion in our third instance.
Now that we have now a useful map, why don’t we add some pictures to the tooltip? This subsequent instance map reveals pictures contained in the tooltip. Or, perhaps you want to have hyperlinks contained in the tooltip. To do that, we’d like the tooltip to be “sticky” and never conceal when the purpose is moused off. Right here is an instance of a “sticky” tooltip map (the JavaScript features have oviously modified barely to make the tooltip stick). Lastly, this method additionally permits for us to put a number of maps on a single web page, so we have now numerous choices.
The place on the earth?#section8
Now again to these fantastic APIs. What if you wish to use one place factors on this world map by latitude and longitude?
Server aspect scripting examples of easy methods to dynamically place factors on the map are past the scope of this text, however right here is a few pseudo code to transform latitude and longitude factors to pixels for the world map picture utilized in our instance:
/* For this instance world map picture in map coordinate
system GCS_WGS_1984 */

// set latitude and longitude
pointLat  = // between -90.00 and 90.00
pointLong = // between -180.00 and 180.00;

// get map top and width
mapHeight = // map top (in pixels)
mapWidth  = // map width (in pixels)

// convert latitude to pixels
pointLat = ( ( pointLat * -1 ) + 90 ) * ( mapHeight / 180 );

// convert longitude to pixels
pointLong = ( pointLong + 180 ) * ( mapWidth / 360 );

/* you might also must appropriate for the dimensions
of the purpose picture positioned on the map */
pointLat  = pointLat  - ( [point image height] / 2 );
pointLong = pointLong - ( [point image width] / 2);
In case you are contemplating utilizing server aspect scripting to dynamically place factors on a map, you may also contemplate having the background picture of the map be set by JavaScript. This might enable a dynamic web page to assign completely different background map pictures to the dl based mostly on the world or zoom stage you want to show.
Let’s overview what we have now carried out:
- Began with a text-based record that has geographic parts
- Turned that textual content record into an HTML definition record
- Styled the
dlto appear to be a map - Styled the
dtcomponents into factors situated across the map utilizing CSS - Styled the
ddcomponents to appear to be a tooltips, however moved them out of view - Used JavaScript to dynamically assign mouse and keyboard occasions to the map factors
- Enabled the
dd“tooltips” to be styled again into view when the map factors are hovered
What have we achieved by doing this?
- Created a text-based map
- Enabled display readers, text-based customers, and search engines like google and yahoo to “learn” the map
- Created a satisfying visible map for sighted customers
- Created an interactive map for mouse customers
- Allowed non-mouse customers to work together with the map with their keyboard
The place to go from right here?#section10
The instance of a extra accessible map introduced right here is simply that, a extra accessible map. It doesn’t declare to be one of the best ways, only a completely different solution to method the issue of making accessible geographic-type content material with out having to create a number of pages in numerous codecs. This instance won’t deal with all sorts of accessibility wants, nor be a really perfect answer to all sorts of internet based mostly maps or GIS functions; nevertheless, a text-based webpage is all the time a terrific place to begin for addressing accessibility issues.
In comparison with different generally used mapping strategies, this method begins with the information and builds a map round it. Textual content content material is separated from the map format. When content material could be separated from format the content material is mostly extra accessible. Because of this an alternate accessible model might not have to be created.
What we have now constructed on this article is simply the beginning of what is perhaps carried out on a map. These similar ideas could possibly be used to put shapes, or perhaps a drill down map to show detailed information for extra particular areas or places. The essential factor to recollect is to start out with the text-based data you need to convey. First make the information readable and helpful as textual content, after which make it right into a map.