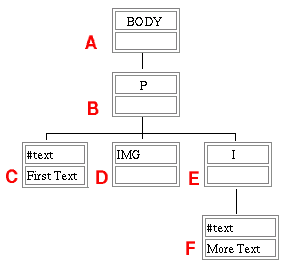
Earlier than the times of digital paperwork and OCR scanning, knowledge entry was a tedious course of involving a lot typing and squinting. You’ll be handed an enormous printout, and requested to sort its contents line by tiring line. In case you grew to become bored or distracted for even a second, you might simply lose your house.
Article Continues Beneath
However you had been intelligent. You bought maintain of a giant previous steel ruler, positioned it on prime of the printout, and moved it down every time you completed typing a row, to remind you the place you had been and what you had already typed.
One ruler to assist us not get caught#section2
With a little bit of JavaScript / DOM sorcery, we are able to present our guests with the identical
performance for lengthy knowledge tables in HTML, by making use of rollover states to the
rows. This could possibly be applied tediously by hand, after all, however it will be foolish to take action. As an alternative, we are going to use the DOM to seek out the rows to spotlight on mouseover.
Earlier than we proceed, see the impact in motion.
To keep away from the script highlighting each desk within the doc, we
want to inform it which tables so as to add the ruler to and which to not. We do that by
giving the tables in query a category with the title “ruler.” Subsequent factor
we have to keep away from is rows within the desk header and the desk footer to be highlighted.
Let’s check out a demo desk:
<desk class="ruler" abstract="Desk of my information">
<caption>My Information</caption>
<thead>
  <tr>
    <th scope="col">Artist</th>
    <th scope="col">Title</th>
  </tr>
</thead>
<tbody>
  <tr>
    <td>Ladytron</td>
    <td>604</td>
  </tr>
    [... more content rows here ....]</tbody>
<tfoot>
  <tr>
    <td colspan="2">Final up to date: 17.03.2004</td>
  </tr>
</tfoot>
</desk>
And the script to use the ruler:
perform tableruler()
{
 if (doc.getElementById &&»
  doc.createTextNode)
  {
   var tables=doc.getElementsByTagName»
    ('desk');
   for (var i=0;i<tables.size;i++)
   {
    if(tables[i].className=='ruler')
    {
     var trs=tables[i].getElementsByTagName('tr');
     for(var j=0;j<trs.size;j++)
     {
      if(trs[j].parentNode.nodeName=='TBODY'»
       && trs[j].parentNode.nodeName!='TFOOT')
       {
       trs[j].onmouseover=perform(){this.»
        className="dominated";return false}
       trs[j].onmouseout=perform(){this.»
        className="";return false}
     }
    }
   }
  }
 }
}
First, we examine to see if the browser helps the DOM; then we get all tables within the
doc, and loop by them.
We examine to see if the title of the desk class is “ruler.” If it isn’t, we skip it and proceed to the subsequent desk.
Whether it is, we take all of the desk rows and loop by them.
We examine to see if the node above the present one is a TBODY (not a TFOOT or THEAD); whether it is, we apply a perform on mouseover that adjustments the row’s class title to “dominated.”
Then we wipe the category title clear on mouse-out.
To regulate the impact, all it is advisable outline in
your model sheet is a category for the ruler:
tr.dominated{
 background:#9cf;
}
These settings will probably be utilized to each highlighted row inside each desk
with the category “ruler.”
If you wish to have completely different rulers for various tables, merely give the
desk an ID:
<desk class="ruler" id="mytable" abstract="Desk of my information">and within the CSS:
#mytable tr.dominated{
 background:#333;
 shade:#ccc;
}
That’s all there may be to it. Might your rule be lengthy and pleased.